

Vintage Inspired Easter Egg DIY
 Today's post has a bit of nostalgia attached to it. As you may know, I am a person who loves holidays, tradition and the joy that comes with celebrating the little things in life. When we decorate for a holiday, some of the best memories are recalled when we unpack things that have been carefully tucked away for the past year. Whether it's something our children made or a gift from a relative, it sparks conversation and brings back a feeling of comfort and happiness. That's what tradition is all about, the feeling of being connected to something special. In our family there is a favorite Easter decoration that has been around as long as I can remember. It's a Sugared Easter Egg that my mom made almost 40 years ago. To my sisters and me, it represents the fun we had at Easter time when we were kids. This year I thought I would try to recreate what my mom made long ago. The process was fun and made me appreciate the effort she put into creating something like this while she had 5 little girls running around!
 This is one of the eggs my mother made. I love the cellophane Easter grass and the little vintage rabbit inside. I remember watching her make these eggs when I was little. She was like the Martha Stewart of the 70's. She would give them as gifts to friends and a few of our favorite teachers. We laugh now at the thought of carrying one of these into the school!
 My mom didn't save the recipe or how-to for these eggs. They are different than the ones you might see today on Pinterest. Instead of using liquid starch these eggs are made with a blend of sugar and glue to make them stronger and give them a more textured look. I used Mod Podge, a balloon, and colored string (all from Michael's craft store).
 I carefully wrapped string around an inflated balloon. I started at the top and went all the way down and around a few times. Then I started wrapping in different directions. It's a little tricky at first but once the string goes around a few times it stays in place nicely. You don't have to completely cover the balloon.
 I suspended the balloon from the light over my table with some of the string. It was the easiest way to apply the sugar mixture and also allowed the balloon to keep its egg-like shape. If you can't do it this way you can suspend the balloon from a hanger on a kitchen cabinet or anywhere you have room.
 I mixed equal amounts of sugar and Mod Podge in a container and spooned it onto the top of the balloon. It goes on thick so I used a sponge brush to spread the mixture out and make sure most of balloon was covered. You will need to handle the balloon while you are doing this so it's a good idea to have a wet cloth handy to wipe off of your hands when you're finished with each layer.
 The excess mixture dripped into the pan. I waited for the first coat to dry almost completely before I added another layer. It's best to work in small batches so the glue doesn't dry out while you wait. Cover any leftover glue and rinse out the sponge while you wait for each layer to dry. I repeated this process until the balloon was almost completely covered and I had a texture I liked. This took almost 2 days.
 When the coating on the balloon was dry and firm to the touch it was ready for the next step.
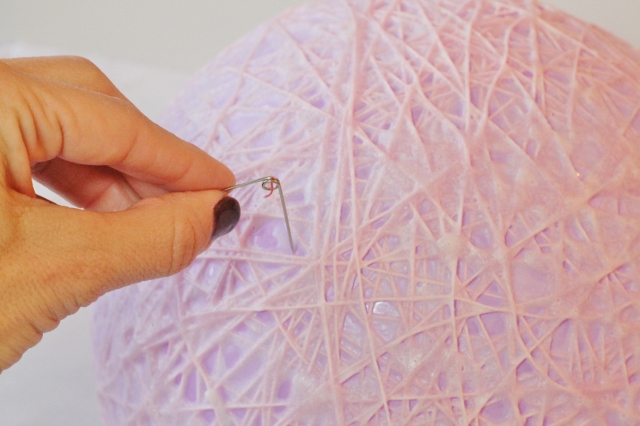 I popped the balloon with a pin to release it from the string. It's so cool to watch what happens when you do this. If you have kids let them watch you do this step.
 The balloon will be stuck inside the egg and may be in two pieces.
 There will be a hole at the top of the egg where the balloon was knotted. Hold the egg upside down so that the balloon falls to the bottom and pull it through the hole. You might need to use tweezers to do this. You will notice that the balloon is wet. The inside of the egg will still be a little bit sticky.
 I cut a hole in the front of the egg with a pair of sharp scissors. If you aren't good at estimating you can draw the opening with a pencil first. Do this right away since the inside of the egg is still slightly pliable. Once you are finished stand the egg up on hard surface so the bottom dries flat.
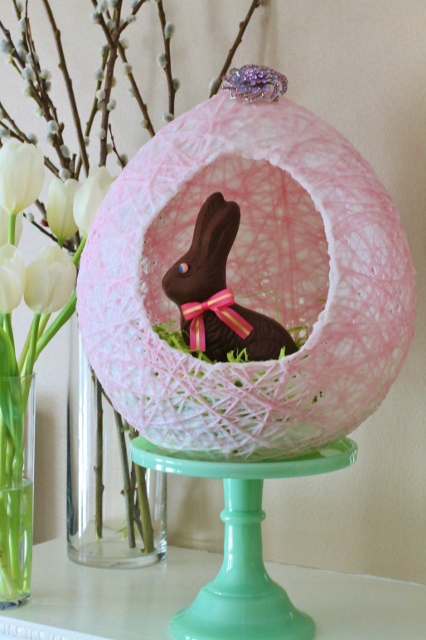
 Instead of using lace like my mom did, I softened the cut edge in the opening of the egg by brushing it with a little bit of glue and sprinkling it with sugar. I filled it with a newer version of Easter grass and placed a chocolate rabbit inside.
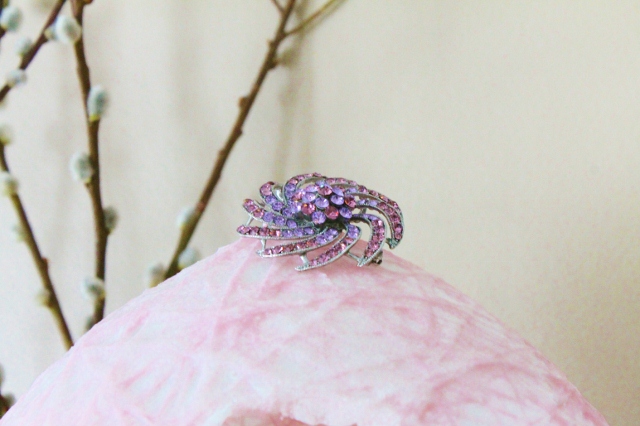 I added a little bit of bling to my egg by placing a pretty crystal broach in the hole at the top of the egg instead of ribbon.
 I love looking at these eggs side by side. Not only is it fun to see how things change over time but it's awesome to think about what something so simple can represent; forty years of memories and tradition that will live on for many years to come. So what may look like a simple little Easter craft is really one of those little things in life that is definitely worth celebrating!
Have a beautiful day!
Leslie xo
Here's what's coming up...
You can put any content in here.