

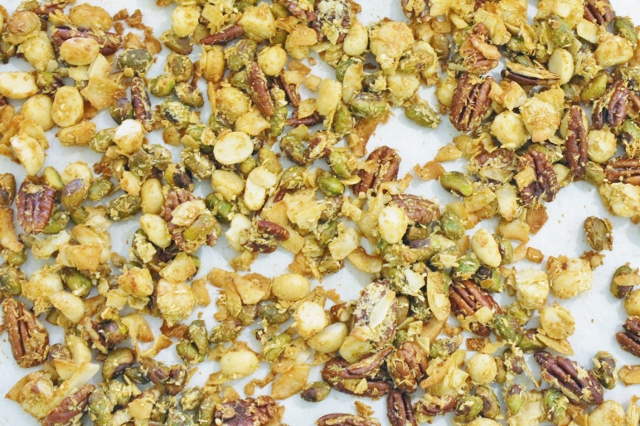
Coconut Ginger Trail Mix
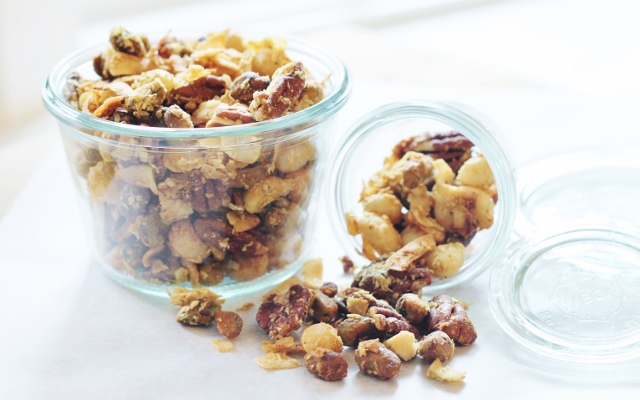 I''m a huge fan of trail mix. I guess it's the combination of flavors and textures along with the never ending variety of ingredients that keeps me interested. It's an easy grab and go snack and when life gets busy, easy is good. I recently found this recipe over at Tasting Table. I love the idea of blending toasted nuts with coconut and ginger and when you toss it with agave nectar and egg whites you've got a really tasty and nutritionally balanced snack. If you're not a fan of curry, which is also tossed in, you can experiment with your favorite spices. That's the fun thing about trail mix, anything goes! Happy Friday!

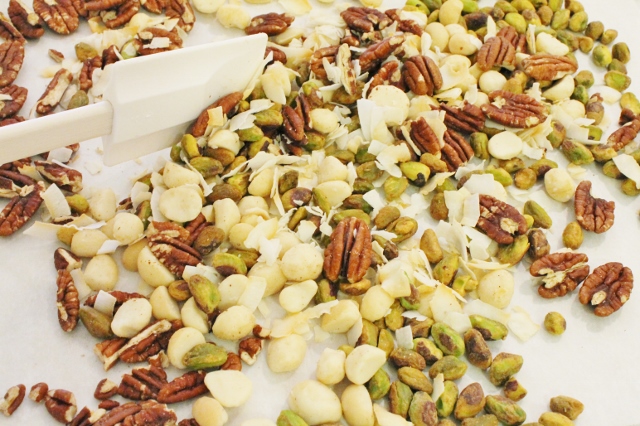

- 3/4 cup raw pistachios
- 1/4 cup finely shredded unsweetened coconut
- 1/4 cup large-flake unsweetened coconut
- 3/4 cup raw pecan halves
- 3/4 cup macadamia nuts
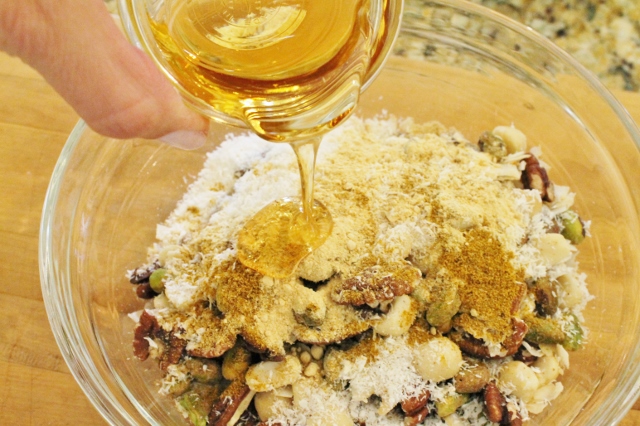
- 1/4 teaspoon curry powder
- 3/4 teaspoon ground ginger
- 1 1/2 tablespoons agave nectar
- 1 large egg white
- Pinch of sea salt
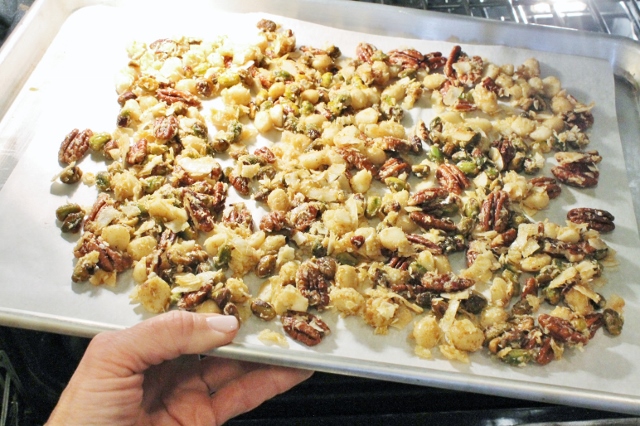
- Preheat oven to 350 degrees
- Place nuts on a parchment lined baking sheet and bake until lightly toasted, about 3-4 minutes.
- Add coconut and bake until lightly toasted, about 2 minutes.
- Transfer nuts and coconut to a heat safe bowl and using rubber spatula stir in spices, agave nectar and egg white.
- Return mixture to baking sheet and bake until golden brown, about 10 minutes.
- Set baking sheet on a wire rack to cool completely. Once cooled, sprinkle mixture with sea salt.
- Serve at room temperature.
- Store in an airtight container.
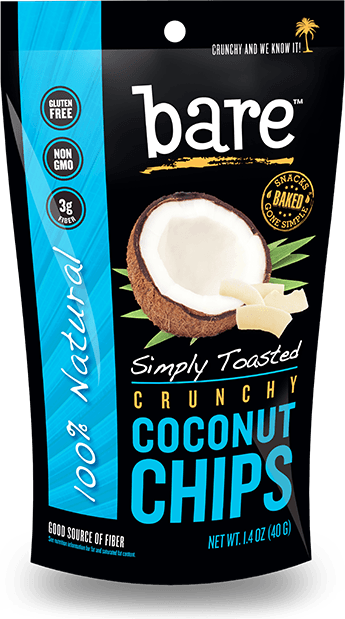 If you love the taste of coconut try adding some Coconut Chips from BARE SNACKS. Bare products are all natural, gluten free and non GMO project verified. Just toss your favorite flavor into the baked trail mix to take your snack to a tastier level! BARE SNACKS are also great right out of the bag for a quick and easy snack!
I've got a hiking trip coming up and even though it's just a day trip I will most likely be tucking some trail mix into my bag that day. So whether you're going on a hike, sitting at the kids soccer games, or just have a busy work schedule, trail mix is always a good idea!
Have a fantastic weekend,
Leslie xo
Happy Valentine's Day!
 Today is Valentine's Day and it's a special day for so many reasons. Sure it's about flowers, candy and cards and we all look forward to sharing those things with the people we love but it's also a day to feel grateful and pay it forward. Do something you might not usually do. There are so many things to be happy about and so many little ways to show people you care. Whether it's your family, a friend or even better, a stranger you've never met. Take the time to do something special. Put a smile on someone's face. Do someone a favor. It will make the day that much better! My little Valentine to you is a simple recipe for sugar cookies that I have actually shared before. It's not just a recipe, it's a tradition. I have been making these cookies for special holidays since my kids were tiny. My mother made them for me and my sisters. It's the tradition that's special, not the recipe (although it's a really good one!). Happy Friday! Happy Valentine's Day! Have a fabulous weekend!
Valentine's Day Sugar Cookie Recipe
Leslie xo
Homemade Boursin Cheese Recipe

Last summer I became a huge fan of Boursin cheese. My rock star cousin (who is the appetizer queen) made a delicious spread for one of our Happy Hour parties at the beach and I've been hooked ever since. I'm not sure I really even knew what Boursin was. I never paid attention, but when it was drizzled with balsamic glaze and scooped up with pretzel chips, it was heaven. My new favorite appetizer! One problem, Boursin is not the cheapest cheese in the case (say that three times!). I was buying it in miniature blocks at the grocery store until I found it at Costco but it was still expensive. Then one day my girlfriend, rather nonchalantly while I was preparing the store bought version, said "You know you can make your own Boursin don't you? It's less expensive too". That was news to me! Where had I been? I have been making my own ever since! Here's how I do it...
 Boursin is basically a mixture of butter, cream cheese and herbs. It's creamy, spreadable, and highly addictive (trust me). You can make it any flavor by using your favorite herbs. This recipe has quite a variety in it but you can keep it as simple as garlic and basil if you prefer.
 Toss all ingredients into a food processor, give it a quick spin and it's done! Ridiculously easy to make!
 The texture of the finished Boursin will be soft. Just place it into a bowl or container, cover and refrigerate until firm.
 My favorite way to serve Boursin Cheese is with a drizzle of Balsamic Glaze and Pretzel Chips (Thanks Rita!). It tastes like something that took a lot of effort but it's probably the easiest appetizer you'll ever make! Perfect for Super Bowl Sunday!
Enjoy!
Leslie xo
- 2 garlic cloves, crushed
- 8 ounces butter, room temperature
- 16 ounces cream cheese, room temperature
- 3 tablespoons fresh grated parmesan cheese
- 1 teaspoon dried dill weed, crumbled
- 1/2 teaspoon dried marjoram
- 1/2 teaspoon dried basil
- 1/2 teaspoon dried chives
- 1/2 teaspoon black pepper
- 1/4 teaspoon dried thyme, crumbled
- 2 teaspoons dried parsley
- Add cheeses and butter to food processor or mixing bowl.
- Add garlic and spices.
- Process or mix all ingredients until well blended.
- Place cheese in container, cover and store in refrigerator.
Pumpkin Pie Biscotti
 Welcome to October! Didn't I just say I couldn't believe summer was over? Well now we've propelled into October, fall is in full swing and I'm wondering where September went! It's all good though. I don't know about you but I am ready for cooler weather, a change in wardrobe and even a change in the menu when it comes to cooking and baking. It's time to bring out the flavors of fall. I have been in a baking mood lately and last week I spent a day in kitchen baking all kinds of fun things. One of my favorites was this Pumpkin Pie Biscotti that I found over on My Baking Addiction. From the pumpkin pie spice to the toasted nut's, it's got a wonderful blend of flavors that are perfect for fall. I love biscotti because it can be enjoyed any time of day with a cup of coffee or tea. So if you're in the mood for some fall baking give this recipe a try, you'll be glad you did!
 You don't have to use a stand alone mixer for this recipe but the dough is firm and I found it much easier to use my Kitchen Aid once I was mixing the wet and dry ingredients together. Just make sure you don't over mix the dough if you use one.
 When you add toasted nuts to the dough it takes the flavor to a whole new level. I love pecans but had a mixture of walnuts and pecans in my pantry so I used them both.
 Once you knead the nuts into the dough you will form two separate logs that are flat on top, not rounded.
 Biscotti means "twice baked" so after you bake the biscotti once, you will slice the logs into individual pieces and place them back in the oven for a second round of baking.
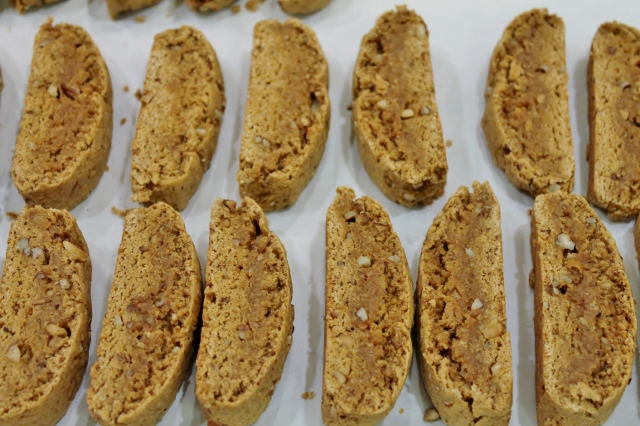 After a second round of baking the inside of the biscotti will be soft but the outside will be nice and crunchy. If you prefer a harder biscotti you can bake them a little longer.
Biscotti is one of my favorite cookies! If they are a favorite of yours you might want to try this recipe for Pine Nut-Orange Biscotti from an earlier post. They are delicious too!
Enjoy!
Leslie xo
- 3 1/2 cups all-purpose flour
- 1 1/2 cups firmly packed brown sugar (I used dark)
- 2 teaspoons baking powder
- 1/2 teaspoon salt
- 2 teaspoons pumpkin pie spice
- 1/2 cup pumpkin puree
- 2 large eggs, lightly beaten
- 1 tablespoon vanilla
- 2 tablespoons butter
- 1 1/4 cup nuts, chopped nuts ( I used pecans and walnuts)
- Preheat oven to 350 degrees. Line a baking sheet with parchment paper.
- Combine flour, brown sugar, baking powder, salt and pumpkin pie spice in a large mixing bowl, stir well. In another bowl combine pumpkin, eggs and vanilla stirring well with a wire whisk.
- Slowly add pumpkin mixture to dry ingredients, stirring until dry ingredients are moistened (mixture will be crumbly at first).
- Heat butter in a large skillet over medium heat. Add nuts. Cook, stirring constantly until nuts are browned. Remove from heat and cool completely.
- Knead cooled nuts into dough. Place dough on lightly floured surface and divide into two equal portions.
- Lightly flour hands and shape each portion of dough into a 2" X 10" log. Place logs several inches apart on a baking sheet. Bake for 24 minutes. Cool logs 15 minutes. Reduce oven temperature to 300 degrees.
- After the logs are cooled, carefully move them to a cutting board and cut diagonally into 1/2" thick pieces using a serrated knife. The outside of the log will be hard but the inside will still be moist.
- Place the biscotti, cut side up, back on the baking sheet and bake for 8 more minutes. Remove the pan from the oven and flip the biscotti over. Bake another 7 minutes.
- Place biscotti on wire racks to cool keeping them separated as they cool so they don't stick together.
- *Optional step - dip into or drizzle with melted white chocolate
- Biscotti will keep in an airtight container for several weeks.
Tandy Cakes Recipe
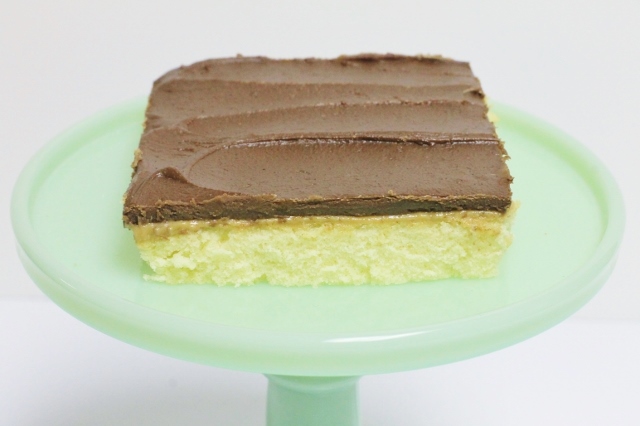 Whenever I see a box of Tastykakes I think back to my days as a little girl. For some reason those boxes of baked goods remind me of packed lunches, after school snacks and life back in the day when we didn't worry so much about many of the things we worry about today. The good old days I guess. Well, even though most of us are now passing up the junk food aisle on our way to the organic aisle in the grocery store, I still think a little flash back to the days of Kandy Kakes and Butterscotch Krimpets is good for the soul. That's why I'm sharing this recipe today. It's been popping up in our house lately for a few occasions and since it brought back some memories for me, I figured sharing it might do the same for you. This recipe is for Tandy Cakes. It's a knock off of those delicious little sponge cakes topped with peanut butter and covered in chocolate. Remember them? Two in a pack? Are you smiling? Well once you make them, you will be. They are that good! This is the pan version and they are every bit as good, if not better than the little cakes you buy. Go ahead, indulge, you won't be sorry!
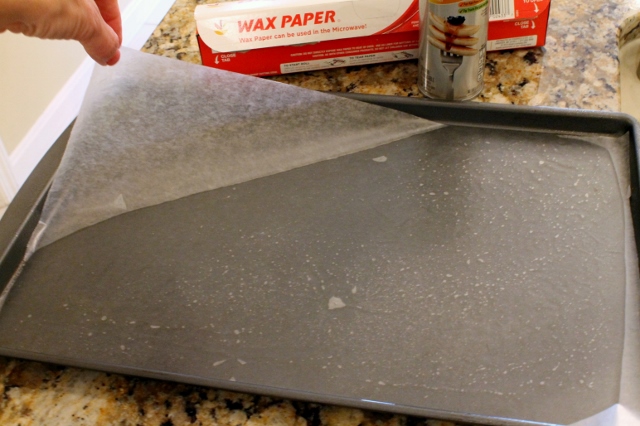 Lining the pan before baking will help avoid sticking. Cover the pan with cooking spray first. Then place a fitted piece of wax paper in the pan. Spray again with cooking spray.
 Pour the batter right on top of the sprayed wax paper.
 Tandy Cakes start with a delicious layer of sponge cake. I actually think this recipe could be used as a base for a lot of other great recipes.
 Next up is a layer of peanut butter.
 It goes onto the sponge cake as soon as it comes out of the oven so it melts into a dreamy sauce that is easy to spread. The pan goes into the refrigerator to cool.
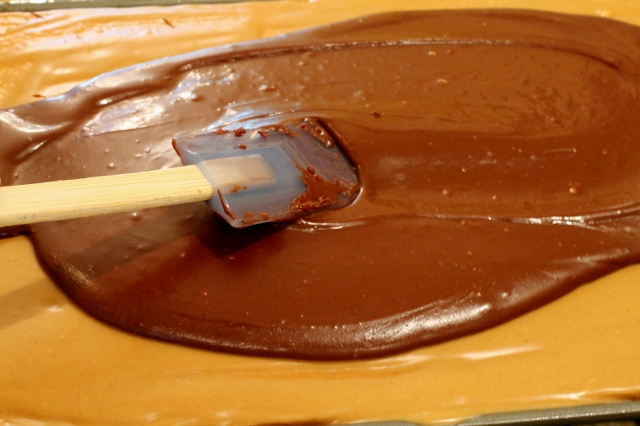 The last layer of the Tandy Cakes is a heavenly cooked chocolate frosting that is spread on top of the chilled peanut butter.
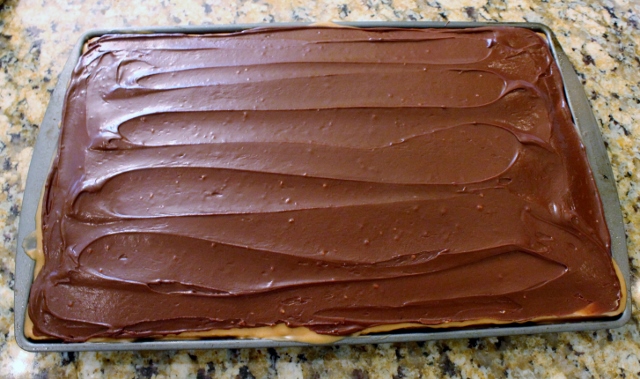 The entire pan is placed in the refrigerator again until the chocolate is set. You can serve Tandy Cakes room temperature or cold. I happen to love them cold!
Enjoy!
Leslie xo
- Sponge Cake Layer
- 4 eggs beaten
- 2 cups sugar
- 2 cups flour
- 1 cup scalded milk
- 2 tablespoons butter
- Peanut Butter Layer
- 1 12-18 ounce jar of peanut butter
- Chocolate Frosting Layer
- 1/2 cup margarine
- 1/2 cup cocoa
- 1 box Confectioner's sugar
- 1/3 cup milk
- Preheat oven to 350 degrees.
- Spray a jelly roll pan with cooking spray, line with wax paper and spray again with cooking spray.
- Beat sugar and eggs together. Add flour and mix well. Melt butter in scalded milk and add to mixture. Pour batter into greased jelly roll pan. Bake 20 minutes or until cake is just browning on the edges and no longer dents when touched.
- Spread peanut butter onto hot sponge cake. Cool just slightly and the refrigerate until chilled.
- Melt butter over low to medium heat. Add cocoa and bring to a boil. Remove from heat and add confectioner's sugar and milk. Mix well. Carefully spread frosting over chilled peanut butter layer. Refrigerate until chocolate is set. Serve room temperature or cold.
- Keep refrigerated.
Ultimate Chocolate Cupcake Recipe
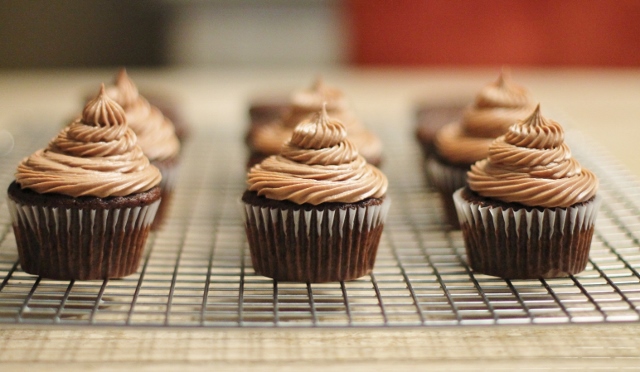 Well, she did it! She is Stefani Pollack, founder of Cupcake Project, a delightful blog devoted to everything cupcake! Last July Stefani began her search for the Ultimate Chocolate Cupcake Recipe. She had already found The Ultimate Vanilla Cupcake Recipe and was now ready to master the chocolate version. She sent out a call for help and from over 500 applicants she chose 50 Explorers to bake, taste and bake again. I was lucky enough to be one of them. The testing went seven rounds and almost a year later The Ultimate Chocolate Cupcake was crowned! I had a great time participating in this project. I learned some things that will help me with my own baking projects so it was well worth every minute in the kitchen! Stefani was so much fun to work with and her determination to keep trying round after round was inspiring. I wanted to share my experience and her recipe with you. You'll want to hang onto this one!
 The project began last July. Stefani would send all 50 Explorers a recipe and we would have to bake the cupcakes, taste them and fill out a survey tracking everything from taste and texture to quantities and bake time. If over 60% didn't like it, it was back to the drawing board and a new recipe. We baked a total of seven rounds before there was a winner.
 We weighed and measured lots of different ingredients. We tried everything from buttermilk and sour cream to water and coffee.
 We kept track of bake time, size and quantities yielded. Some recipes were really, really delicious and some were not. I can't imagine trying to round up 50 bakers' opinions and experiences, especially when everyone has different tastes. Stefani had quite a task on her hands but was determined to keep going. One of the worst parts for me was having to say that one of the recipes was not the ultimate when I knew it was one Stefani had a lot of faith in. I was not alone and we kept going.
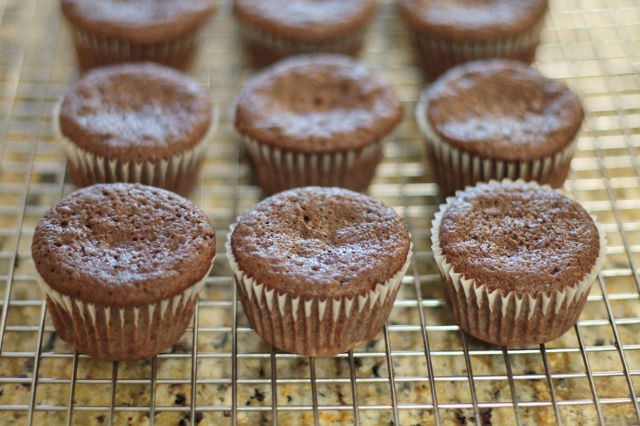 Some of the recipes resulted in a delicious but flat cupcake.
 Some of the recipes were the opposite, nicely domed but not the best flavor.
 Finally, after seven rounds of baking and tasting, The Ultimate Chocolate Cupcake was discovered! This one had the most amazing chocolate flavor AND the perfect texture for a cupcake. And most of us agree, it truly is an amazing chocolate cupcake! If you are a chocolate lover you will love this cupcake! Head over to Cupcake Project for the recipe and to learn more about Stefani Pollack!
Enjoy!
Leslie xo
 Click Here for The Ultimate Chocolate Cupcake Recipe
Photo credit for crowned cupcake: Cupcake Project
Simple Pasta Salad Recipe
 It's hard to believe June is upon us! I don't know where the time goes but it seems like every time I blink, another year goes by! My house is buzzing right now. There are kids home from college, a wedding coming up and people coming and going every day. It's total chaos and I love it! Everyone has a different schedule though so planning meals can be tough with a full house. It's a challenge to keep the pantry and fridge stocked let alone have something prepared when someone needs a quick meal. There are certain things that are great to have on hand during busy times and pasta salad is one of them. It's inexpensive, easy to make in large quantities and tastes great, especially when you have a recipe like the one I am sharing today. It's an old recipe that has been in my family for several generations. My grandma made it, my mom made it and now I make it. It's simple but delicious.
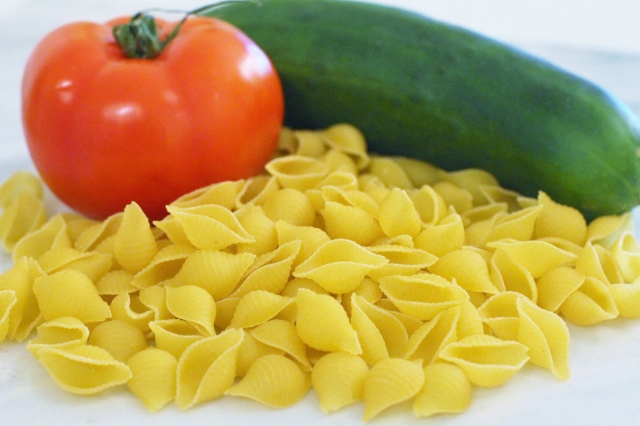 Small pasta shells, tomatoes and cucumbers are the main ingredients in this recipe.
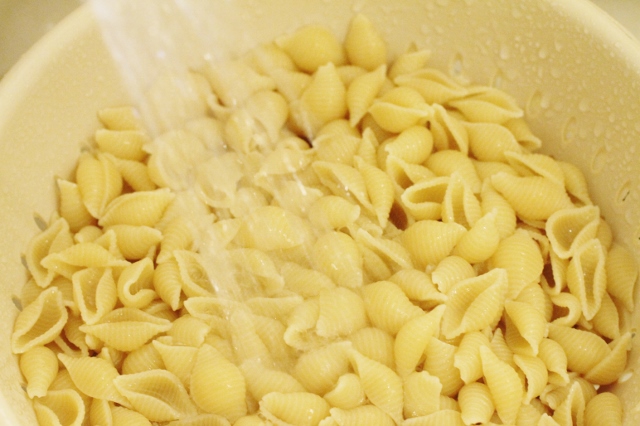 It's easy to make. Just boil the pasta, rinse it in cold water and drain.
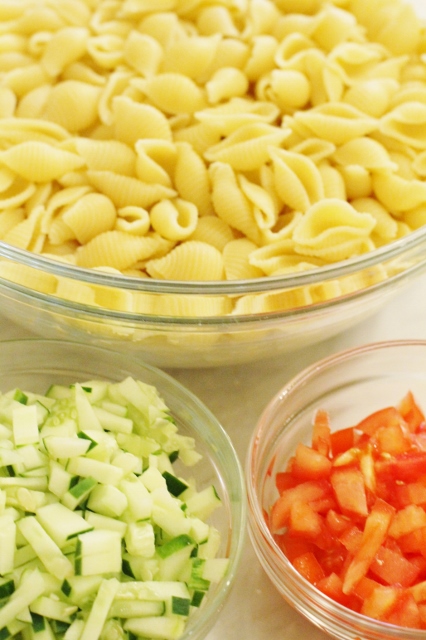 Add chopped cucumber and tomato.
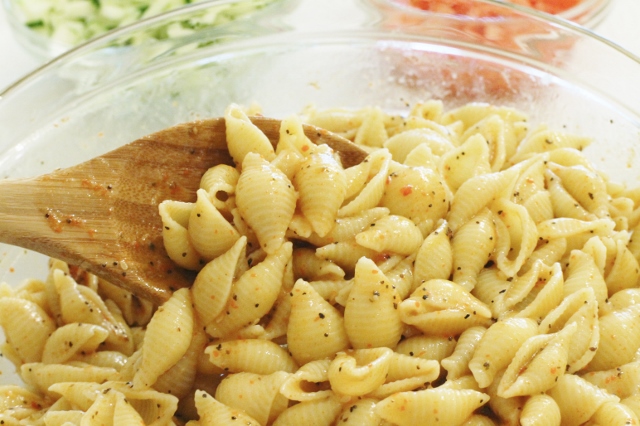 Toss with McCormick Salad Seasoning, onion powder and Wishbone Italian Dressing.
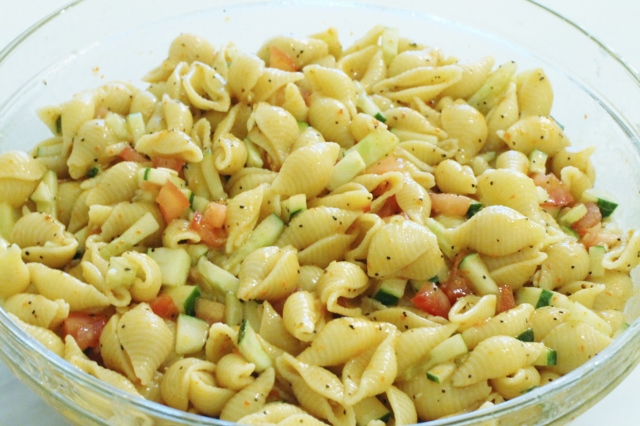 That's it. It doesn't get much easier!
Keep it simple and enjoy!
Leslie xo
- 1 pound small pasta shells
- 1 large tomato chopped fine
- 1 cucumber diced
- onion powder
- 1/2 bottle of McCormick Salad Seasoning
- 1 large bottle Wishbone Italian Dressing
- Croutons (optional)
- Cook pasta according to package directions. Drain and place in a large bowl.
- Toss cooked pasta with Salad Seasoning and Dressing.
- Add a sprinkle of onion powder and stir.
- Add cucumber and tomato and toss until combined.
- Add croutons.
- Refrigerate.
- Serve cold.
Sorbet and Sugar Cookies
 We officially kicked off the summer season yesterday and for most of us that means picnics, parties and lots of warm weather fun ahead! I love this time of year and in our family, there are so many things happening in the next few weeks, I can hardly contain myself. Life will be busy but I'm looking forward to getting together with some of my favorite people. I'm also looking forward to the opportunity to host some informal gatherings in our home. Whether it's dinner or dessert, I love bringing people together. Today I'm sharing two dessert recipes with you. One is a recipe for homemade sorbet. It's a simple recipe that can be made ahead of time and is refreshing in warm weather. The second is my favorite sugar cookie recipe. I'm including it simply because I like the idea of serving cookies with sorbet. Both are great to have on hand all summer.
 I used a blend of fresh strawberries, blueberries, blackberries, and raspberries to make sorbet.
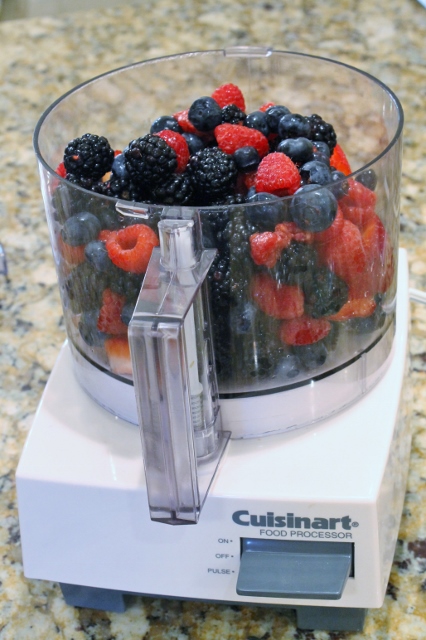 I used my food processor to blend the ingredients but an immersion blender would work too.
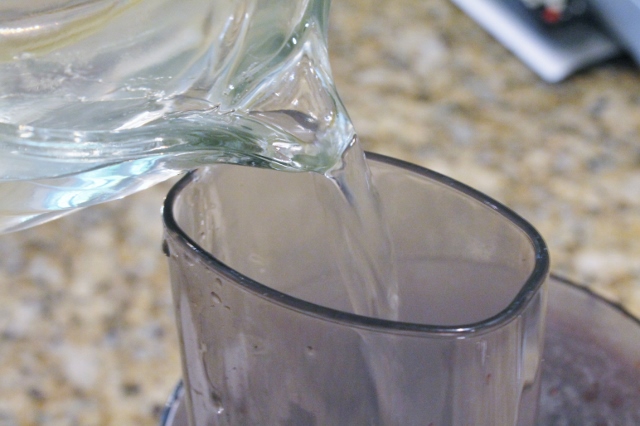 Simple syrup and a pinch of salt were added to the fresh berries as they were pureed in the food processor.
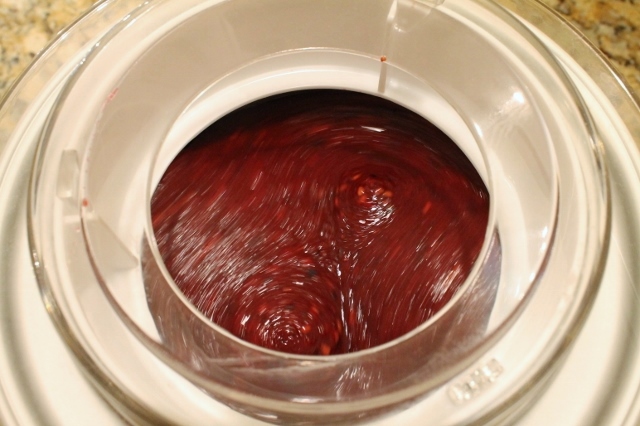
 I like the texture of the whole fruit in this sorbet so once it was blended, I didn't strain the puree. If you prefer a smoother texture you can pour the mixture through a fine mesh strainer after it's blended.
 I covered the mixture and placed it in the refrigerator for about 3 hours.
 While the sorbet was in the refrigerator I made the sugar cookies. I rolled the dough into a log shape so I could slice and bake the cookies instead of rolling and cutting them.
 I sprinkled some colored sugar on the cookies to dress them up.
 Once the puree chilled for a few hours I poured it into my Ice Cream Maker to make the sorbet. If you don't have an ice cream maker you can put the puree in the freezer until it's firm. Either way works fine! Another trick if you like softer sorbet but don't have an ice cream maker is to freeze the puree until it's firm and then put it back in the blender before serving to break it up and make it smooth again.
 After about 10 minutes in the Ice Cream Maker the mixture started to thicken.
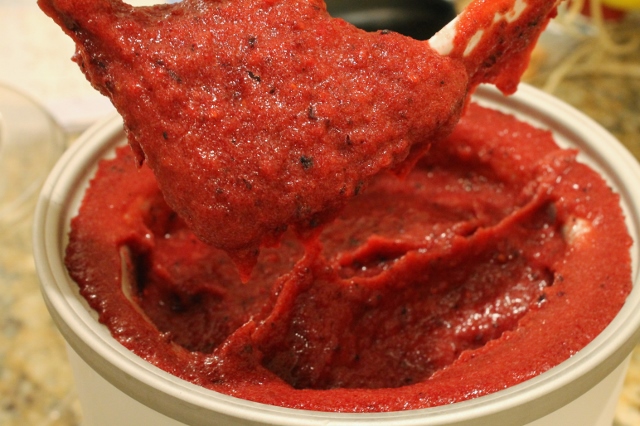 In about 20 - 25 minutes the sorbet was finished. The consistency was soft and creamy but could be eaten right away. If you like a firmer consistency you can freeze your sorbet for a few hours before serving. Serve sorbet with sugar cookies.
- 5 cups of fresh mixed berries (I used strawberries, raspberries & blueberries)
- 2 cups water
- 1 1/2 cups sugar
- pinch of table salt
- Prepare simple syrup by combining water and sugar in a saucepan over low to medium heat. Cook mixture until sugar is completely dissolved.
- Allow simple syrup to cool for a few minutes.
- Place berries, salt and simple syrup in an immersion blender or food processor and blend until mixture is smooth.
- Pour into a bowl, cover and refrigerate 2 to 3 hours or overnight. *pour mixture through a fine mesh strainer first if a seedless sorbet is preferred.
- Pour mixture into ice cream maker and mix until thickened (according to machine instructions) 15-20 minutes. Sorbet will be a soft consistency. Pour sorbet into airtight container and place in freezer for 1 to 2 hours for a firmer consistency. Remove from freezer about 15 minutes before serving.
- 3/4 cup butter
- 1 cup sugar
- 2 eggs
- 1 teaspoon vanilla
- 2 1/2 cups flour
- 1 teaspoon baking powder
- 1 teaspoon salt
- Cream butter and sugar together until smooth.
- Add eggs and vanilla and mix until creamy.
- In a separate bowl combine flour, baking powder and salt.
- Mix dry and wet ingredients together until combined.
- Roll dough into a ball or log for slicing, wrap in wax paper or plastic wrap and refrigerate dough for 1 to 2 hours.
- Preheat oven to 375 degrees. Line baking sheets with parchment paper.
- Roll and cut cookie dough with cookie cutters or slice and place on baking sheets.
- Bake 5-7 minutes.
- Cool and Enjoy
Enjoy and Happy Summer!
Leslie xo
Healthy Granola Bar Recipe
 As you may know if you follow my blog, I am a big fan of oatmeal and granola. I love the taste and texture of grains and when they are paired with dried fruit and nuts, there is rarely a combination I don't like. It's great for breakfast, lunch and mid-day snacking. The only drawback is that it's difficult to eat granola and oatmeal on the run. We all have busy schedules and so many times, when we are in a hurry, we grab processed bars and call them a meal. Recently I found a recipe for healthy granola bars on Martha Stewart. They seemed simple to make and the bars looked delicious so I tried them. I love how they turned out and will definitely make them again. There are no artificial ingredients in these bars so you can feel good eating them. You can also tailor them to your taste by substituting ingredients. Try using different fruits and nuts or simply omit the flax or oat bran if you are sensitive to it and add more oatmeal. Be creative and make them your own.
 Dried fruit, nuts and grains are the main ingredients in these granola bars. Cinnamon, salt and honey are also added keeping them simple and healthy. I want to point something out here. When you look at the ingredient list on the recipe, you will notice two forms of measurement, cups and weights. I found that very helpful when I was shopping. I bought my ingredients in the bulk food section at Wegman's and purchased the exact weight I needed. It was less expensive than buying a whole bag of each item.
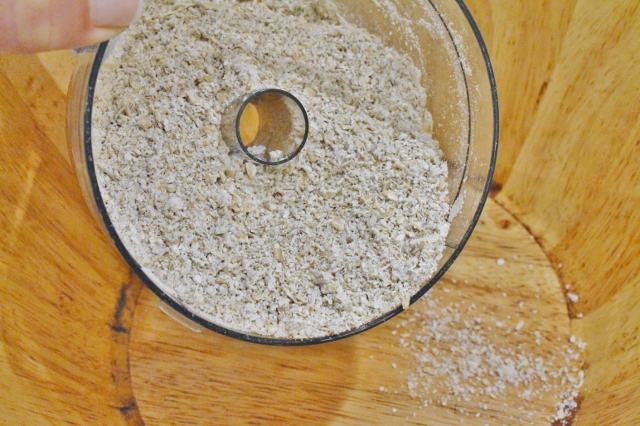 I bought old-fashioned organic oats and ground them at home in my food processor.
 The nuts in this recipe are toasted before chopping which really brings out their flavor.
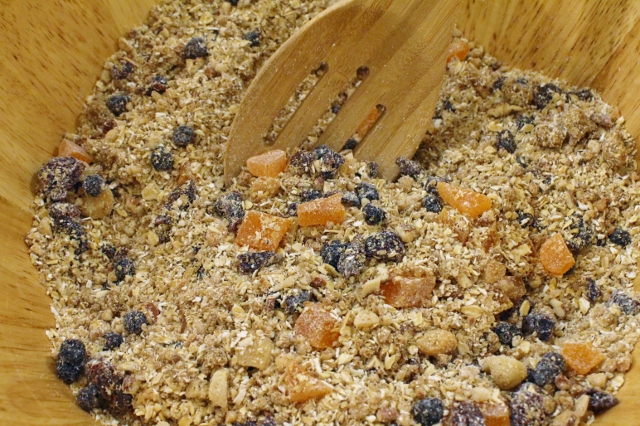 Everything is tossed together in one large bowl. It doesn't get much easier than that.
 Honey and pureed dates hold the dry ingredients together. There are no eggs, butter or oil in this recipe.
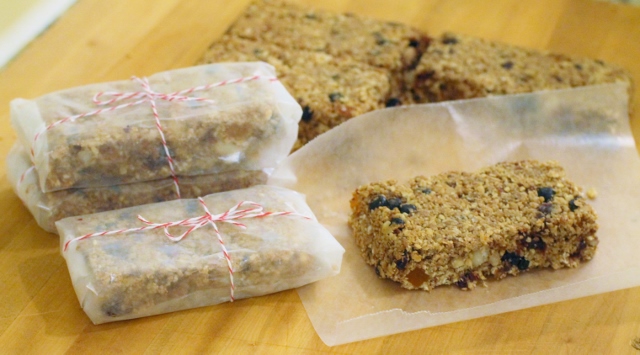
 The mixture is pressed into an 8 X 8 pan to bake and then cut into bars.
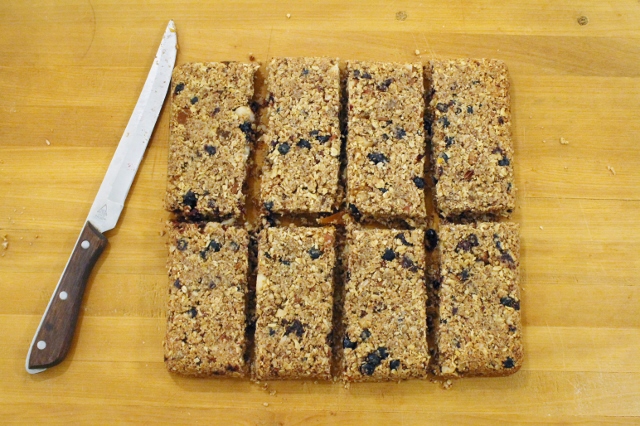 One recipe will give you 8 bars. They are delicious!
- 1 cup (9 ounces) pitted dates
- Vegetable-oil cooking spray
- 1 1/2 cups old-fashioned oats, finely ground, or 1 cup quinoa flakes
- 1 cup (4 1/2 ounces) pecans,toasted, 1/2 finely ground, 1/2 coarsely chopped
- 1/2 cup (2 ounces) unsalted macadamia nuts, toasted, 1/2 finely ground, 1/2 coarsely chopped
- 1/3 cup (2 1/4 ounces) dried papaya, cut into 1/2 inch pieces
- 1/3 cup (1 3/4 ounces) dried cherries, chopped
- 1/3 cup (2 ounces) dried blueberries
- 2 tablespoons oat bran
- 3 tablespoons ground flaxseed
- 2 tablespoons wheat germ
- 1/2 teaspoon coarse salt
- 1/2 teaspoon ground cinnamon
- 3 tablespoons brown-rice syrup or honey
- Preheat oven to 350 degrees
- Place dates in a small saucepan, cover with cold water, and bring to a simmer. Drain. Puree in food processor until smooth.
- Coat an 8-inch square baking pan with cooking spray.
- Mix oats or quinoa, nuts, papaya, cherries, blueberries, bran, flaxseed, wheat germ, salt and cinnamon in a large bowl.
- Mix in date puree and brown-rice syrup or honey.
- Press mixture into pan.
- Bake until center is firm and edges are golden, about 25 minutes.
- Let cool in pan on a wire rack.
- Cut into 8 bars.
Enjoy!
Leslie xo
Mother's Day Brunch Recipe Ideas
 Fresh Berries in Orange Juice
I recently published a post about a Baby "Sprinkle" I hosted for my daughter, Lauren. It was a recap of the wonderful little brunch we put together to celebrate my newest grandchild, who will be arriving this month. Oh just typing that makes me giddy! Anyway, since it was a Favorite Things post, there were no recipes included with the photos. I have been receiving requests for some of those recipes ever since. I thought it would be fun to share them today since we will be celebrating Mother's Day this weekend. We served French Toast Souffle and Sun-dried Tomato and Asparagus Frittata at the Sprinkle. I added the Fresh Berries in Orange Juice recipe because it goes well with the other two. Together they are all you need for a perfect Sunday brunch!
This Fresh Berries in Orange Juice recipe is a fun way to serve a fruit salad. Fresh squeezed orange juice and a sprinkle of confectioner's sugar adds a little extra flavor and sweetness while still keeping it healthy. And it looks pretty too!
- one cup fresh sliced strawberries
- one cup fresh blueberries
- one cup fresh red raspberries
- one cup fresh blackberries
- 3/4 cup fresh squeezed orange juice
- 1 tablespoon confectioner's sugar plus extra for sprinkling
- Place berries in a large bowl, set aside.
- Add confectioner's sugar to orange juice and mix until combined.
- Pour orange juice mixture over berries and toss lightly.
- Sprinkle confectioner's sugar over berries before serving.
 French Toast Souffle
This recipe for French Toast Souffle is amazing! My sister Lori served it at a brunch she had a few years ago and it was a hit. I made sure I had the recipe before I left. It is now one of our favorites. You prepare it a day ahead so it's ready to go when you are.
- 10 cups sturdy white bread cut into 1" cubes (about 16 slices)
- 8 ounces cream cheese, softened
- 8 large eggs
- 1 1/2 cups milk
- 2/3 cup half-and-half
- 1 1/4 cups maple syrup divided into 1/2 and 3/4 cups
- 1/2 teaspoon vanilla
- 2 tablespoons confectioner's sugar
- Place bread cubes in a 13 X 9" pan that has been sprayed with cooking spray.
- Beat cream cheese until smooth.
- Add eggs, one at a time, mixing well after each addition.
- Add milk, half-and-half, 1/2 cup of maple syrup and vanilla. Mix until smooth.
- Pour cream cheese mixture over top of bread.
- Cover and refrigerate overnight.
- Preheat oven to 375 degrees.
- Remove bread from refrigerator; let stand on counter for 30 minutes.
- Bake for 50 minutes or until set.
- Sprinkle souffle with confectioner's sugar and serve with maple syrup.
 Sun-dried Tomato and Asparagus Frittata
A Frittata is a nice way to serve eggs at a brunch. It's easier than making individual omelettes and less work than quiche. You can add anything you want to it so use this as a base recipe and customize it to your own taste.
- 1 dozen large eggs
- 1/2 cup sun dried tomatoes
- 1/2 lb asparagus, cleaned and cut into 1" pieces
- olive oil
- your favorite grated cheese for sprinkling
- Beat eggs until fluffy.
- Drizzle 2-3 tablespoons of olive oil in the bottom of a large non-stick skillet over medium heat.
- Add asparagus and sun-dried tomatoes and saute until heated through and asparagus is cooked.
- Add eggs and lightly swirl pan to distribute asparagus and tomatoes.
- Gently run a rubber spatula around the inside edge of the pan as the eggs begin to cook to help eggs spread out. Cook on medium to low heat until the eggs begin to set on the bottom of the pan.
- Once the eggs are starting to set on the bottom but still wet on top, place entire pan under broiler (on low) until eggs are cooked through and no longer wet.* If you are using a skillet with plastic handles, cover them with foil before placing pan under the broiler.
- Turn off broiler and sprinkle cheese over top of Frittata.
- Transfer Frittata to a large cutting board or leave in pan and cut into pie shaped slices to serve.
Easy Black Bean Salsa Recipe
 It's hard to believe today is the last day of April. Spring is moving along and the months are flying by. How can it be May already? What's fun about the time flying is with each new month comes some new reason to celebrate and for me, an excuse to throw a party! This weekend, on May 5th, people everywhere will be celebrating Cinco de Mayo. To get into the spirit of this Mexican holiday, I thought I would share one of my family's favorite recipes for Black Bean Salsa. My daughter Lynsie started making this salsa when she was in college. It was a great tailgate food then and makes a great party food now. The recipe yields a huge bowl of salsa so it's perfect for a crowd. It's simple to make and great to have on hand when you have a houseful of people or feel a happy hour brewing!
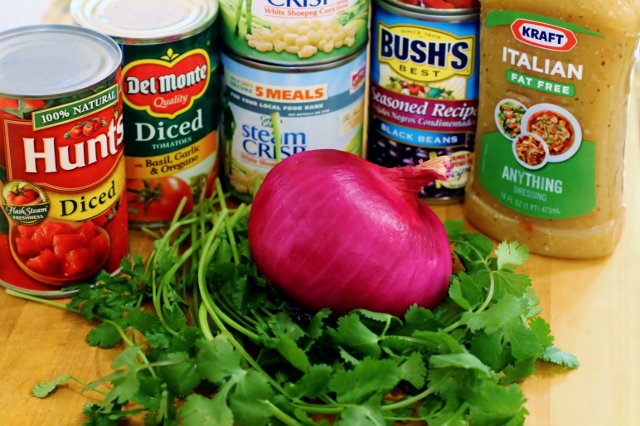 This recipe is so simple because almost every ingredient comes from a can or bottle.
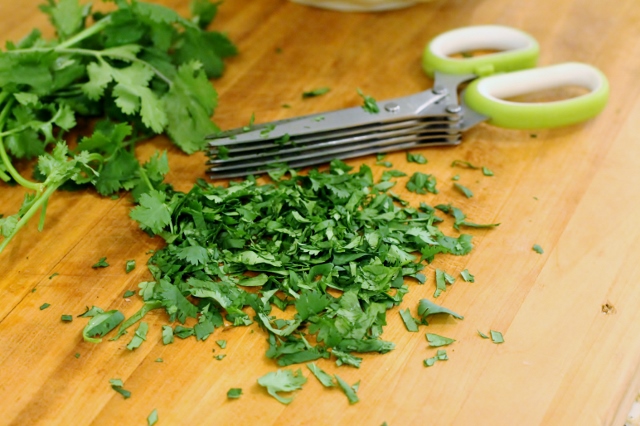 Fresh chopped Cilantro makes the flavor come alive in this salsa recipe. You can use as much or as little as you like.
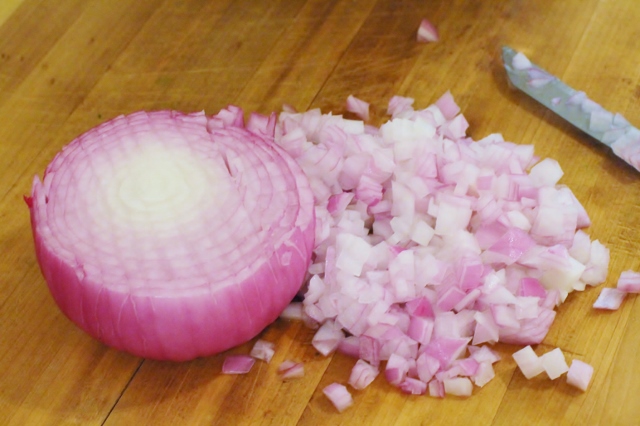 Chopped red onion is the only other ingredient that you need to prepare.
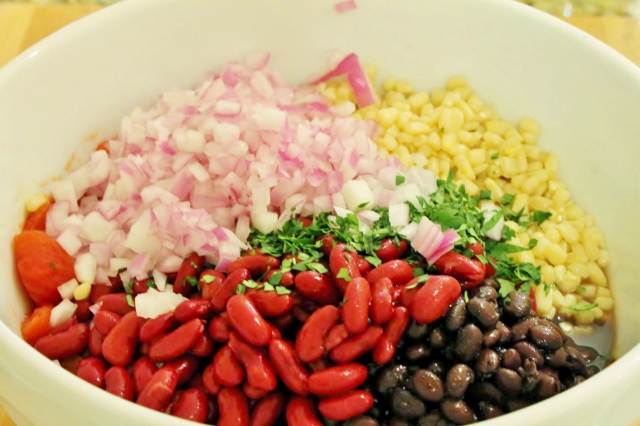 Everything gets tossed into a bowl and refrigerated.
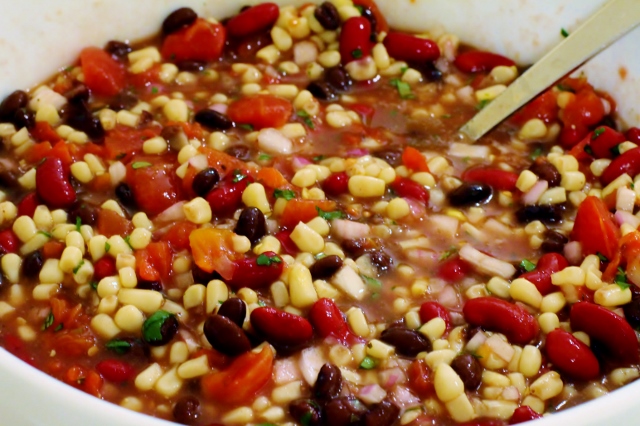 It's the perfect quick recipe for picnics, happy hours or parties. Just add chips and you are good to go!
- 1 can diced tomatoes (basil, oregano & garlic flavored)
- 1 can regular diced tomatoes
- 1 can Seasoned Recipe black beans (Bush's)
- 1 can Seasoned Recipe kidney beans (Bush's)
- 2 cans white shoepeg corn
- 8 ounces fat free Italian dressing
- chopped cilantro
- chopped red onion
- Drain liquid from kidney beans and black beans but do not rinse. Drain corn.
- Add all canned ingredients to a large bowl.
- Chop onion (to taste) and add to bowl. Use as much as you like. I used about 2/3 of a large onion.
- Chop cilantro (to taste) and add to other ingredients. I used about 1/4 cup of chopped cilantro.
- Stir ingredients together and refrigerate.
- Best served cold. Make a day ahead if possible so flavors have a chance to blend.
- Add chips and serve!
Enjoy!
Leslie xo
Peanut Butter Sandwich Cookies
 My peanut butter addiction is getting the best of me lately and the urge to make anything that contains it has taken over. In order to justify the need to satisfy my craving, I decided to test a slightly healthier version of my favorite peanut butter sandwich cookie recipe. I found this recipe over at Martha Stewart but the original is from the 'wichcraft restaurant. These cookies taste amazing on their own but when you sandwich them with the peanut butter filling, you take them to a whole new level. I made them with natural ingredients so they are healthier than the traditional variety and taste just as good. If you like peanut butter, you will love these cookies!
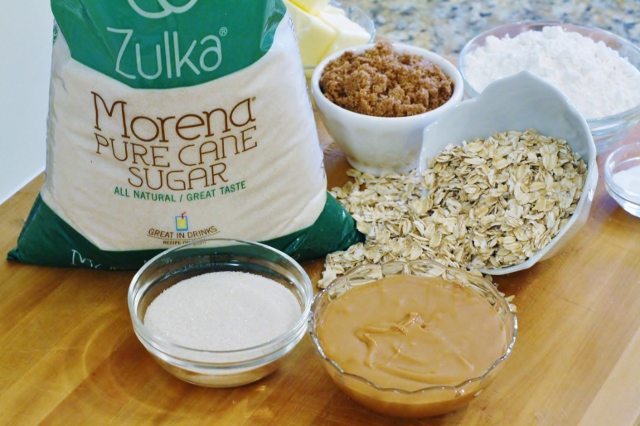 These cookies are made with old-fashioned oatmeal, organic peanut butter and natural sugar. I used Zulka Pure Cane Sugar* which is a Non-GMO Project verified "Morena" sugar that is not only healthier but has a great flavor and works well in baked goods.
 The oats are toasted on the stove with butter before they are added to the dough.
 Once toasted, the oats are cooled before they are mixed with the other ingredients. This step adds a wonderful flavor to the cookies.
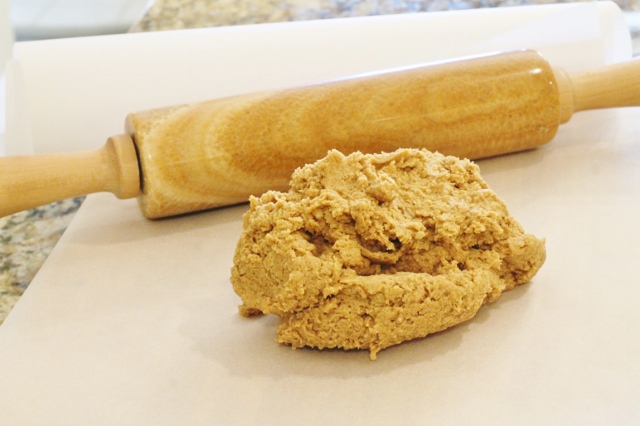 The cookie dough is rolled out between parchment paper before it's chilled and cut.
 The dough is refrigerated for about 20 minutes and then it's cut into circles.
 Believe it or not, I do not have a circular cookie cutter. I used a 2" wide glass to cut out the dough. It worked just as well.
 Because I used natural peanut butter, the dough was softer than it would be if I used regular peanut butter. You can use whichever you prefer.
 Turbinado sugar is sprinkled on top of the cookies before they are baked. It adds a perfect sweet element to the peanut butter flavor.
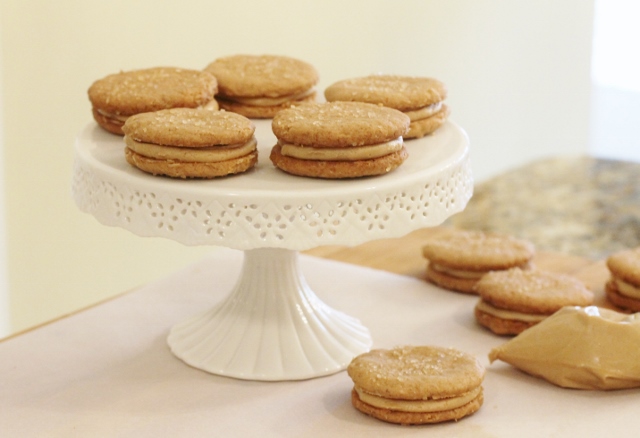
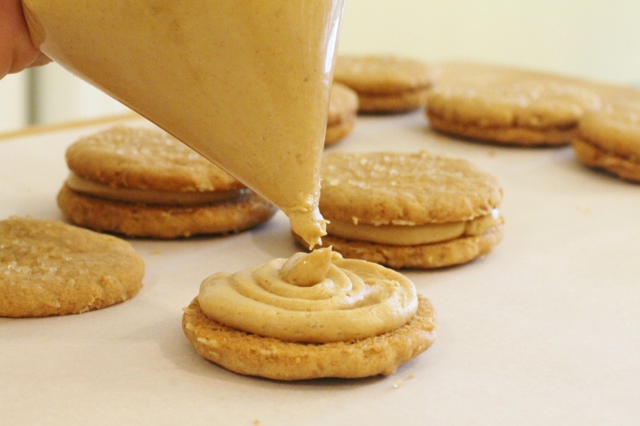 A wonderful smooth and creamy peanut butter filling is swirled between each sandwich cookie. This is your wow factor!
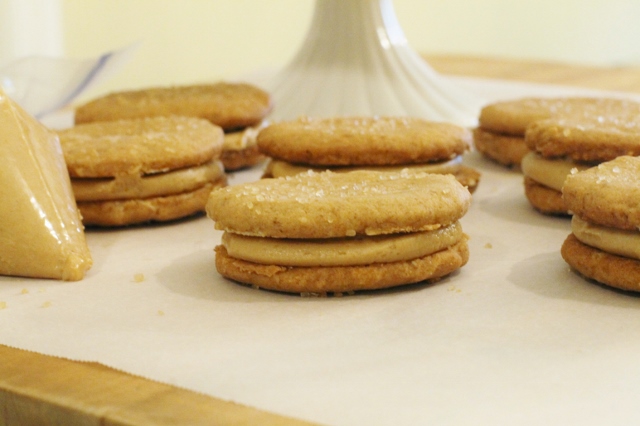 The recipe makes about 12-18 sandwich cookies depending on how thin you roll your dough.
- Cookies
- 1/2 cup plus 4 tablespoons unsalted butter, room temperature
- 1 cup old fashioned oatmeal
- 1 cup plus 2 tablespoons all-purpose flour
- 1 teaspoon baking soda
- 1 teaspoon salt
- 1/3 cup granulated sugar - I used [url href="http://zulka.com/" target="_blank"][b]Zulka Pure Cane Sugar[/b][/url]
- 1/2 cup packed dark brown sugar
- 1/2 cup peanut butter - I used organic peanut butter*
- Turbinado sugar, for sprinkling
- Peanut Butter Filling
- 4 tablespoons unsalted butter
- 3/4 cup peanut butter
- 1/4 cup confectioners' sugar
- 1/2 teaspoon salt
- Line a baking sheet with parchment paper, set aside. Melt 4 tablespoons butter in a medium saucepan over medium heat. Add oats and cook, stirring, until toasted, 5 to 7 minutes. Spread oat mixture onto prepared baking sheet and let cool.
- Meanwhile, preheat oven to 350 degrees. Line 2 baking sheets with parchment paper or a nonstick baking mat; set aside.
- In a medium bowl, whisk together flour, baking soda, and salt; set aside. In the bowl of an electric mixer fitted with a paddle attachment, cream together remaining 1/2 cup butter, granulated and brown sugars. Add peanut butter and mix until well combined.
- Add oat mixture and flour mixture; mix on low speed until combined. Turn dough out onto a piece of parchment paper. Cover dough with second piece of parchment paper and roll out dough, between parchment, to 1/4 inch thick. Carefully slide rolled dough onto the back of a baking sheet and transfer to a refrigerator until chilled, about 20 minutes.
- Remove top layer of parchment paper; cut out cookies using a 2-inch round cookie cutter. Place cookies 1 inch apart on prepared baking sheets; sprinkle with turbanado sugar.
- Transfer baking sheets to oven and bake until golden, rotating baking sheets halfway through baking, about 10 minutes. Let cool completely on baking sheets.
- When cookies have cooled completely, snip the end of the pastry bag and squeeze filling in a spiral motion on the bottom side of half of the cookies. Top with remaining cookies to form sandwiches.
- Mix all ingredients together in the bowl of an electric mixer fitted with the paddle attachment on medium speed until smooth. Transfer filling to a disposable pastry bag until ready to use.
Please note ~ If you make these cookies with natural peanut butter, the dough will be softer and the cookies will be a little more crumbly than cookies made with regular peanut butter. The filling will be softer too. The flavor is still amazing. Consider yourself warned! These cookies are addictive!
Enjoy!
Leslie xo
*About Zulka Sugar
Zulka® Pure Cane Sugar is real, unrefined granulated “Morena” sugar made from freshly-harvested sugar cane that is a better-tasting and less-processed cup-for-cup replacement for refined white sugar. Morena sugar is a term used to describe granulated sugars that do not undergo conventional refining processes, which remove the complexity and depth of flavor present in raw sugar cane after it has been pressed. Zulka Pure Cane Sugar preserves the natural properties of the sugar cane plant, while retaining a flavor profile that’s as close to fresh sugar cane as possible, making it a better alternative to white sugar for baking, cooking and beverage recipes as well as all other everyday sugar uses. With a distinctively pure taste, and rich color and aroma, Zulka delivers a full-bodied and aromatic sweetness to all your favorite recipes.
For more information on Zulka Pure Cane Sugar go to www. Zulka.com
This is a sponsored post. All opinions are my own.
Lemon Ricotta Cookies
 I love to bake and I'm always looking for new recipes. This past weekend, I wanted to make dessert for Easter dinner and since there would be plenty of chocolate around, I decided to look for something a little lighter. I found a wonderful recipe for Lemon Ricotta Cookies. They were easy to make and the result was a pretty little glazed cookie that was a perfect addition to the Easter menu. They were delicious too, so I thought I would share them with you.
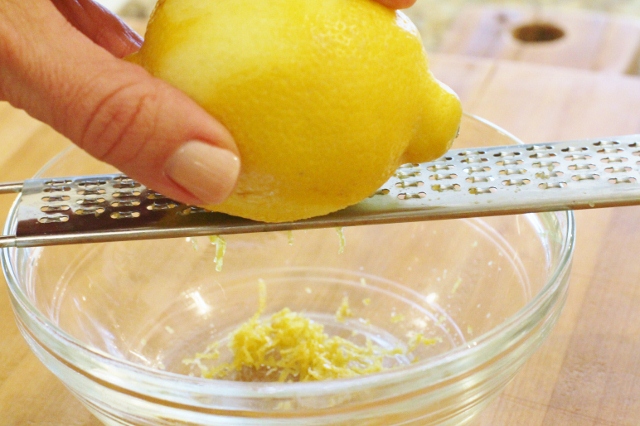
 Ricotta cheese and fresh lemon are two of the main ingredients in these cookies. It's a delicious combination.
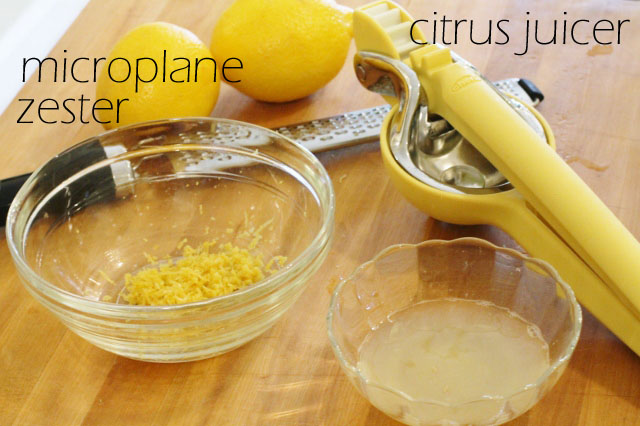 The recipe calls for lemon zest and lemon juice. Use a Microplane grater/zester and a citrus juicer to make it easier.
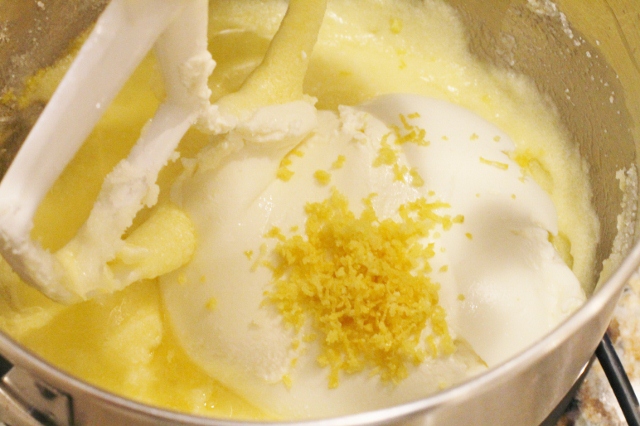 The lemon zest not only looks pretty scattered throughout the cookie, it tastes fresh too.
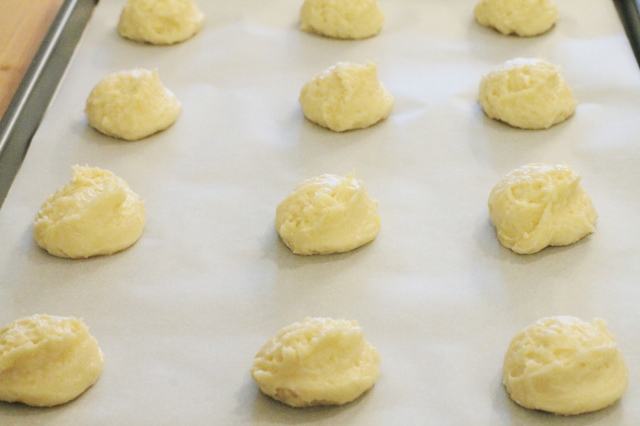 I used a 1 3/4" cookie scoop to transfer the dough onto baking sheets.
 These cookies bake nicely into perfect mounds that are easy to glaze. You need to watch them closely while they are baking. I noticed the bottoms brown quickly and because the dough is light, they might not appear to be done on top but probably are. Test them by tapping the tops of the cookie and if it bounces back they are done.
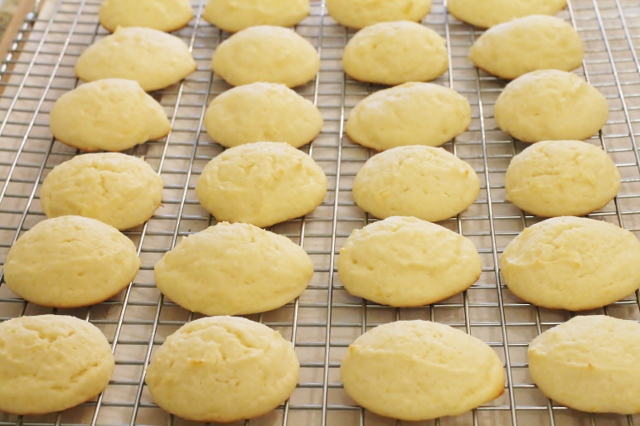
 Lemon zest is also added to the glaze that tops the Ricotta Cookies.
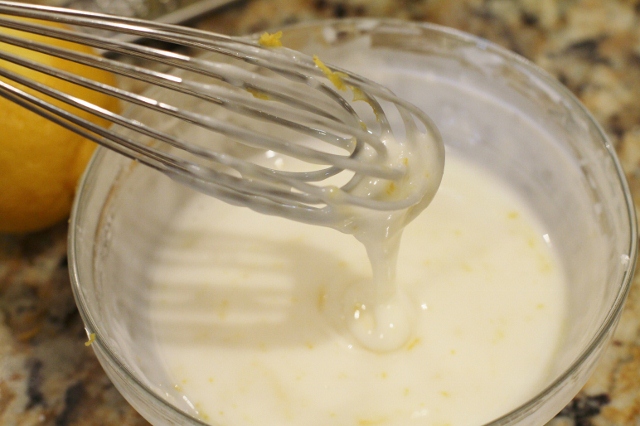 You can use lemon juice or water to make the glaze. I used water because I didn't want a strong lemon flavor with this cookie. If you like a more intense lemon flavor just substitute equal amounts of lemon juice for the water.
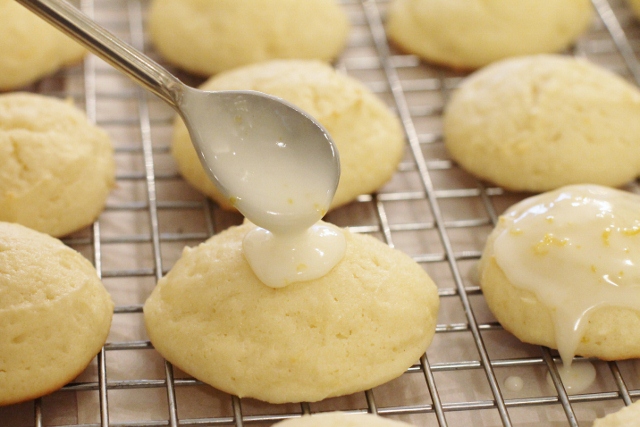 The glaze should be thin. Place the cookies on a rack and spoon a couple teaspoons of glaze on top of each one. Let it drip down the sides.
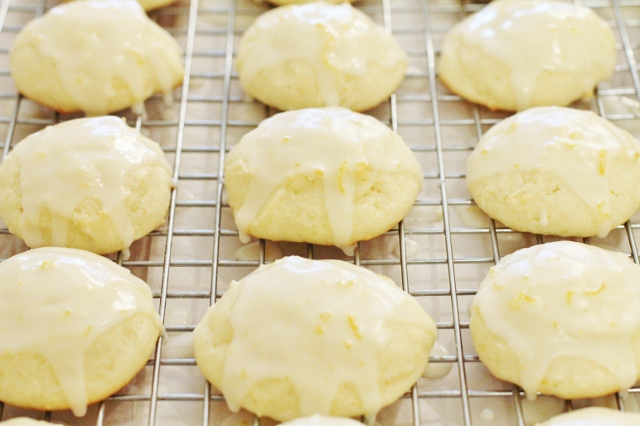 Let the cookies sit for an hour or two before serving so the glaze can dry.
- Cookies
- 2 1/2 cups all-purpose flour
- 1 teaspoon baking powder
- 1 teaspoon salt
- 1 stick unsalted butter, softened
- 2 cups sugar
- 2 eggs
- 1 (15-ounce) container whole milk ricotta cheese
- 3 tablespoons lemon juice
- 1 lemon, zested
- Glaze
- 1 1/2 cups Confectioner's sugar
- 3 tablespoons water or lemon juice
- 1 lemon, zested
- Preheat the oven to 375 degrees. Line baking sheets with parchment.
- In a medium bowl combine the flour, baking powder, and salt. Set aside.
- In the large bowl combine the butter and the sugar. Using an electric mixer beat the butter and sugar until light and fluffy, about 3 minutes.
- Add the eggs, 1 at a time, beating until incorporated.
- Add the ricotta cheese, lemon juice, and lemon zest. Beat to combine.
- Stir in the dry ingredients.
- Spoon the dough (or use a cookie scoop) onto the baking sheets.
- Bake for 12- 15 minutes, until slightly golden at the edges or tops bounce back when touched.
- Remove from the oven and let the cookies rest on the baking sheet for 20 minutes.
- Combine all ingredients together in a small bowl until smooth.
- Spoon glaze onto the top of each cookie, spreading it lightly. Let excess drip down.
- Let the glaze harden for an hour or two before stacking or packaging.
This is a great cookie recipe with room for experimenting. The next time I make them I might use orange zest and try a chocolate glaze. I'll let you know how they turn out!
Enjoy!
Leslie xo
Green Beans with Bacon and Brown Sugar Recipe
 You might be surprised to see a Saturday post. Well, I was typing a recipe for someone and started thinking about how many times I have been asked for this particular dish and I figured why not put it on the blog so whoever wanted it could come here and print it. Consider it a bonus recipe! It's a delicious but simple green bean recipe that I found in the Williams-Sonoma Thanksgiving recipe booklet last year. It was a huge hit and is now a favorite for us. I am making it again for Easter. It's a nice change from the standard green bean casserole so if you want something new, this is a good one to try. I couldn't find the recipe on the Williams-Sonoma website and the booklet was seasonal so here you go:
- 8 thick slices of bacon
- 6 tablespoons unsalted butter, melted
- 1 ½ teaspoons salt
- ¾ teaspoons roasted garlic powder (regular is fine)
- 1 ½ lbs green beans, trimmed and blanched
- ¼ cup firmly packed light brown sugar
- Preheat oven to 350 degrees. Line a baking sheet with parchment.
- In a large nonstick frying pan over medium heat, cook bacon in batches until the slices are just beginning to brown along the edges but are still underdone and pliable, 4-6 minutes. Transfer to a paper towel lined plate and let cool, then cut each slice in half crosswise.
- In a small bowl, whisk together the butter, salt and garlic powder.
- Divide the green beans into 16 equal portions, about 6 beans each. Gather each portion into a neat bunch and wrap a half slice of bacon around the center to hold the beans together. Place the bundles on the prepared baking sheet with the loose ends of the bacon underneath. Sprinkle the brown sugar evenly over the bundles and drizzle with the butter mixture.
- Roast until the bacon is cooked through and browned, 20 – 25 minutes. Let stand for 3-5 minutes. Transfer the green bean bundles to a warmed platter and serve immediately.
- Once the bacon is partially cooked and cooled, toss it with the blanched green beans and place in a large pan or casserole dish.
- Drizzle the butter mixture over the beans and bacon and toss together.
- Sprinkle with the brown sugar.
- Bake until bacon pieces are cooked and beans are heated through.
Enjoy!
Leslie xo
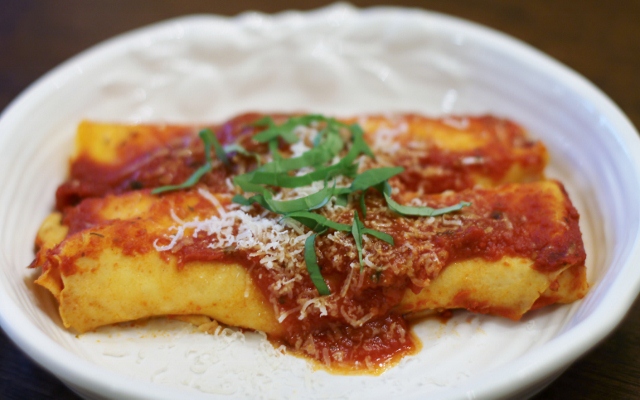
Homemade Manicotti
 I love pasta. Whether it's a bowl of linguine or a plate of lasagna, it's all good to me. Most of the time I will make a simple dish like penne or spaghetti with marinara sauce but once in a while, when I have some time, I'll make something a little more involved like homemade manicotti. Instead of using store bought pasta I make crepes. They are actually easier to fill and they taste so much better. I'll show you how I made mine.
 I have a basic crepe recipe I use for both sweet crepes and manicotti. There are only a few ingredients. If I am making sweet crepes I add sugar.
 I like to add different ingredients to the crepe mixture for a little extra flavor. It's fun to be creative here. I have been in the mood for basil lately so I decided to add some to this batch. By the way, these cool scissors make cutting fresh herbs so much easier. If you chop a lot of herbs, I highly recommend getting a pair!
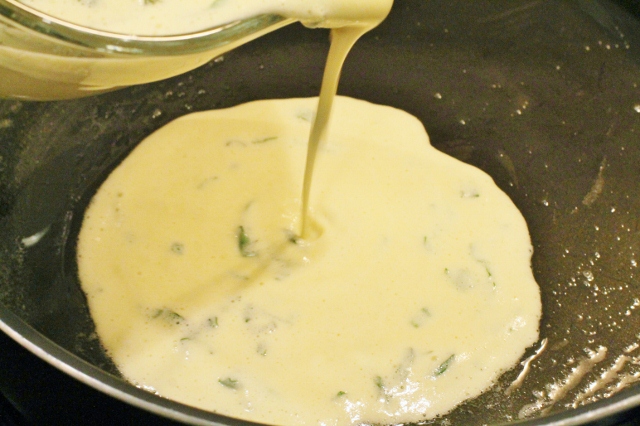 I do not use a crepe pan. I use a large frying pan that is brushed lightly with olive oil and a tiny bit of butter. I keep the heat low so the crepes don't burn or stick. I pour the crepes the same way I would pour a pancake but I make them much thinner. I flip them with a regular spatula.
 A thinner crepe makes a lighter, tastier manicotti.
 One recipe yielded fifteen 6-7 inch crepes.
 I fill the crepes with a blend of cheeses, egg and seasoning.
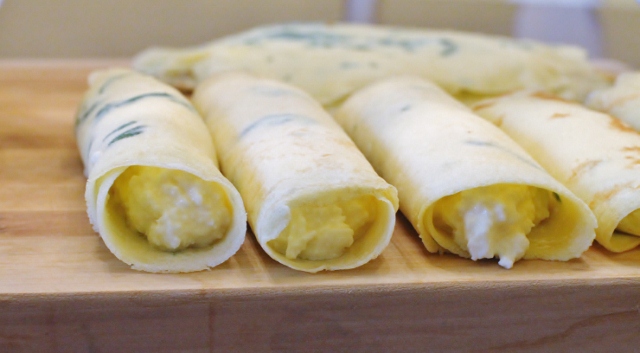 Once the crepes are rolled I will bake some and freeze the rest. I like to freeze them without sauce so I can easily take out what I need later.
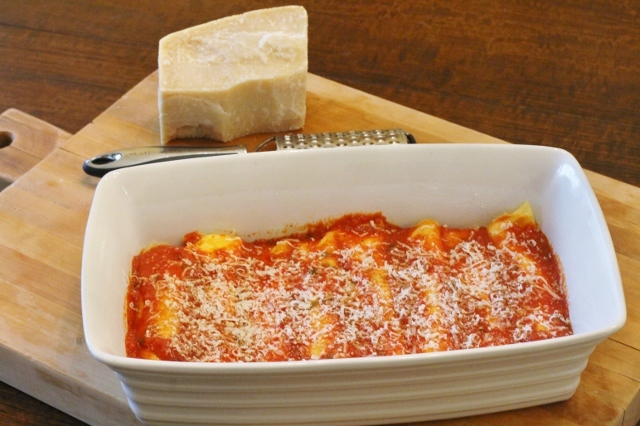
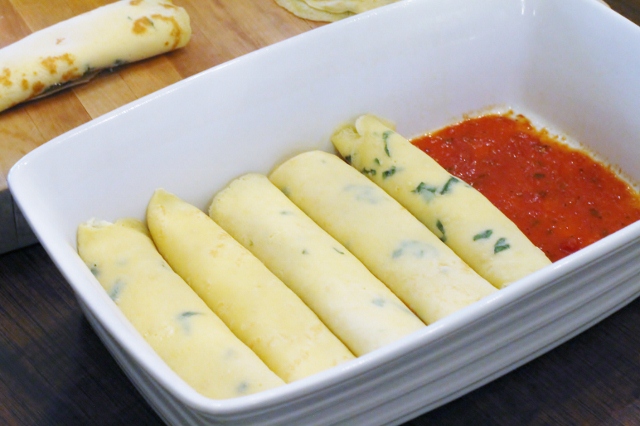 I will place the remaining manicotti in a greased baking pan that has a layer of sauce on the bottom.
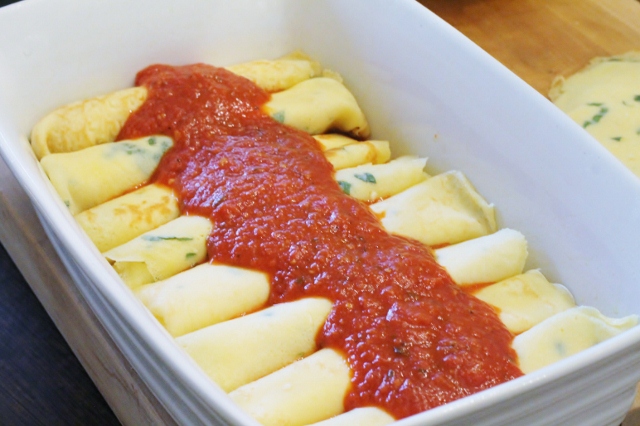 I cover the manicotti with additional sauce and some grated cheese and bake it for about 40 minutes.
 There are so many ways to make this great Italian dish. If you have a favorite recipe or fun idea, I would love to hear about it!
- Basic Crepe Recipe
- 1 1/4 cup flour
- 3 eggs beaten
- 1 1/2 cups milk
- 2 tablespoons melted butter
- pinch of salt
- Cheese Filling for Manicotti
- 1 15 ounce container ricotta cheese
- 2 cups of your favorite shredded Italian cheese ( I use a blend of mozzarella, provolone, parmesan and asiago)
- 2 eggs beaten (for thicker cheese filing use 1 egg)
- salt and pepper
- Italian seasoning (optional)
- Additional Ingredients
- Pasta sauce ( 1 jar or 4 cups of homemade sauce)
- Grated cheese for topping
- Blend all ingredients in mixing bowl beating well. Let batter stand up to an hour for more perfect crepes.
- Pour a thin layer of batter into a heated pan that has been brushed lightly with olive oil and butter.
- Cook over low heat just until batter comes together to form a crepe.
- Flip crepe to cook other side and then carefully lift out of the pan with a spatula and place on a plate.
- Repeat until batter is gone.
- Blend all ingredients together.
- Place a few tablespoons of cheese mixture on top of each crepe and roll.
- Line the bottom of a greased pan with your favorite sauce (I use homemade marinara sauce. If using store bought sauce, you will need approximately 1 large jar for 1 batch of crepes.
- Cover the crepes with sauce and grated cheese (optional).
- Bake at 350 degrees for 30-45 minutes until the crepes are heated through.
Mangia!
Leslie xo
Lemon Cheese Bar Recipe
 This past weekend we had beautiful weather in Central Pennsylvania. The sun was shining and it was 60 degrees outside. It felt like spring and the warm weather made me wish winter would just move on. I was in the mood to bake so I thought I'd celebrate the changing seasons with something light and fresh like Lemon Cheese Bars. I have had this recipe for years. My children's grandmother baked them when the kids were little and shared the recipe long ago. They are easy to make and so delicious. It's no wonder people ask for the recipe all of the time. Lemon Cheese Bars are perfect served with tea or coffee.
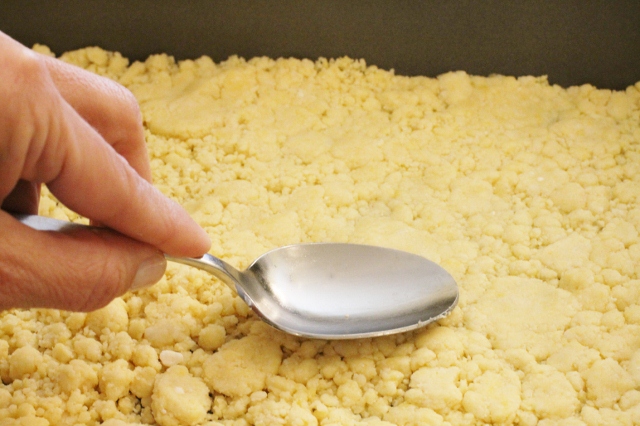 Lemon Cheese Bars start with a boxed yellow cake mix. You add a few other ingredients to make a crumb mixture that is pressed into the bottom of a cake pan.
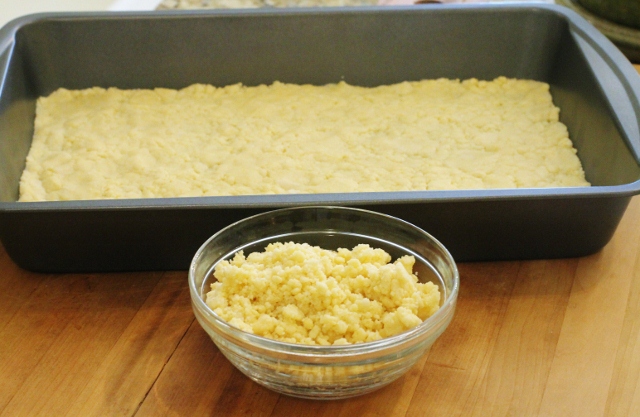 One cup of the crumbs are reserved for the top layer of the bars.
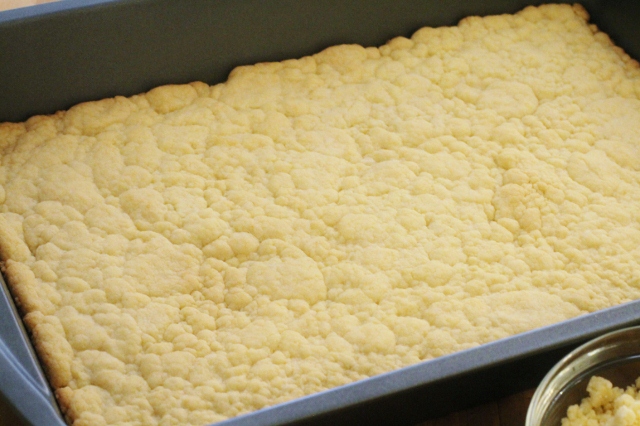 The crumbs that were pressed into the pan are baked for about 15 minutes creating the first layer of the bars.
 Cream cheese, an egg and sugar are whipped to make a topping for the bars.
 Fresh squeezed lemon juice is a key ingredient in the whipped topping.
 The whipped topping is spread on top of the first baked layer.
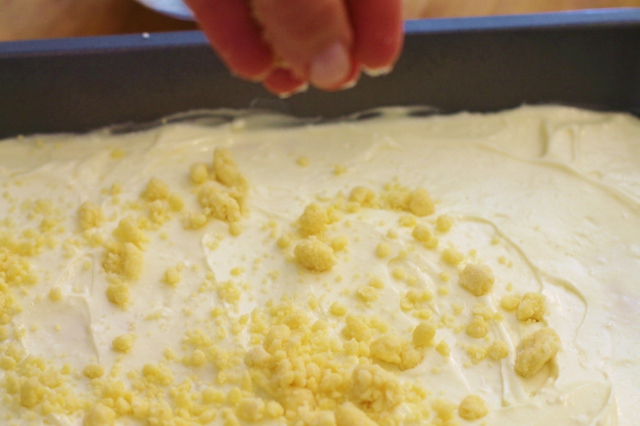 The reserved crumbs are sprinkled on top of the whipped topping and the pan is put back in the oven to bake for 15 more minutes.
 When the Lemon Cheese Bars are cool, cut into squares to serve.
- 1 box yellow cake mix (pudding in the mix)
- 8 ounces softened cream cheese
- 1/3 cup sugar
- 1 teaspoon lemon juice
- 2 eggs
- 1/3 cup vegetable oil
- confectioner's sugar (optional)
- Preheat oven to 350 degrees.
- Mix cake mix,1 egg and oil until mixture is crumbly; set aside 1 cup.
- Pat remaining crumbs lightly into an ungreased 13 X 9 pan.
- Bake for 12-15 minutes or until just beginning to brown.
- Beat cream cheese, sugar, 1 egg and lemon juice until light and smooth.
- Spread mixture over baked layer.
- Sprinkle with remaining crumb mixture.
- Bake 15 minutes longer.
- Cool. Cut into bars to serve.
- Lightly sprinkle with confectioner's sugar before serving (optional)
Lemon Cheese Bars look pretty on a dessert bar and are perfect for an afternoon tea or Easter brunch.
Enjoy!
Leslie xo
Celebrating Fasnacht Day
 I grew up, and still live in Central Pennsylvania. Each year, on the Tuesday before Lent, people in the Pennsylvania Dutch Country, who are largely German American, celebrate Fasnacht Day. Also known as Mardi Gras or Shrove Tuesday, Fasnacht Day is the tradition of using up the fat in your house before the Lenten season begins. When I was a kid, it was an excuse to eat a doughnut, which is basically what a Fasnacht is. Being a person of tradition, I jumped right on board with the celebration when my kids were little and we would spend that morning making our own Fasnachts. We did it the easy way. I bought refrigerator biscuits and they would roll them out and cut a hole in the center. We would fry them in oil and they would each have their own little plate of "Fasnachts". It was a tradition we all enjoyed.This year, for some reason, I decided it would be fun to make actual Fasnachts from scratch so I did some research and found a recipe. My experience was interesting. It was not a difficult process but it was a little time consuming. I'll show you what I did.
 The ingredient list is simple but I had to get past the fact that you use lard and/or oil. Just reading that part of the recipe had me running toward the treadmill. Then I remembered that's what "Fat Tuesday" is all about, and I kept going.
 Once the ingredients are mixed and kneaded together, the dough has to rise for about 4 hours.
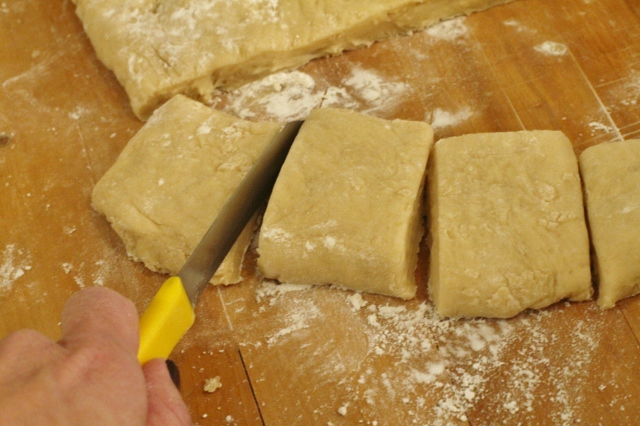
 The dough is then rolled out and cut into squares or rectangles. The shape of the Fasnachts vary depending on where you are.
 Most Fasnachts don't have a hole in the center.
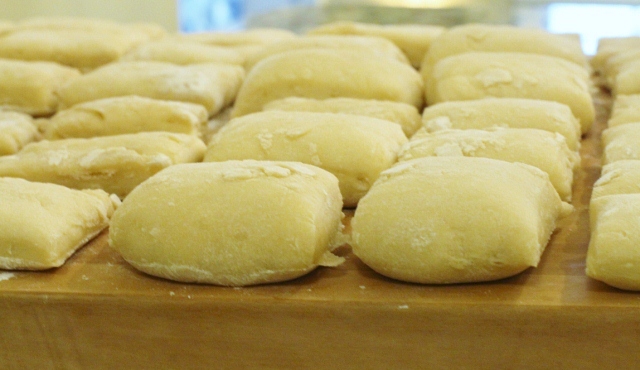 Once the Fasnachts are cut into shapes, they sit and rise for another hour.
 The Fasnachts are fried in oil until both sides are golden brown.
 They are placed on paper towels to drain and cool.
 I sprinkled my Fasnachts with regular and powdered sugar.
- 2 cups milk, scalded and cooled to lukewarm
- 1/3 cup lard or vegetable oil
- 3/4 cup sugar
- 1 teaspoon salt
- 2 eggs, beaten
- 1/2 cup lukewarm water
- 1 package dry yeast, dissolved in the water
- 3 lbs unbleached, all-purpose flour (to stiffen)
- Mix together all ingredients except flour.
- Gradually add flour, stirring well using spoon, until too thick.
- Using hands, start kneading, gradually adding more flour until no longer sticky.
- Cover with a wet cloth and let rise in a warm place for about 4 hours.
- Roll dough on a floured board to 1/2 to 3/4 inch thickness.
- Cut into rectangles about 2 1/2 x 3 1/2 inches.
- Make hole in center (optional)
- Place on floured board and let rise about 1 hour.
- Deep fry in lard or vegetable oil at 360 degrees until golden brown.
- Flip to other side and brown.
- Drain on paper towels.
As you can see, making Fasnachts is not a quick process, at least not with this recipe. I'm glad I tried them. It was fun and I definitely learned a few things. I'll try anything once, and in this case, only once. I prefer to hang onto the memories of making the simple version with my kids. That's what it's really about. Tradition and celebrating the little things!
Enjoy the day!
Leslie xo
Super Easy Super Bowl Recipes
 Remember earlier this month, when I said I wasn't making a resolution to give up my favorite foods? Well, this is one of the reasons why.... Sunday is Super Bowl Sunday! And although I admit, I am not much of a football fan, I never said I didn't like a party! Super Bowl Sundays were made for parties. That means lots of good food! Whether you are hosting the party, hanging on the couch with family or going somewhere to cheer your team on, you will most likely be whipping up something for the game. If you have a busy week and don't have a lot of time to spend in the kitchen, you might want to check out the recipes I am sharing today. All three are super easy and can be made with just a few simple ingredients. Put them together and they make a meal so all you need are the cold drinks and some pretzels or chips and you're good to go! Make it easy this year and enjoy the party! I'm going to!
 Three Ingredient Pulled Pork Sliders
My daughter Lynsie found a great recipe for pulled pork while she was in college. We would make it in a crock pot and take it to the tailgate parties at the Virginia Tech football games. It was a big hit with the kids and the parents. It's great for a crowd but can be made in smaller amounts for a family dinner. It's ridiculously easy to make and absolutely delicious! Our favorite buns to use are the Kings Hawaiian Sweet Rolls. The small dinner rolls make great slider buns.
- Pork Tenderloin - approximately 2 lbs
- Root Beer - 2 bottles or 1 liter
- Sweet Baby Ray's Barbecue Sauce - approximately 16 ounces
- Slider buns
- Place pork tenderloin in crock pot or slow cooker.
- Pour Root Beer over pork to almost cover.
- Cook on low for 5-6 hours or high for 3-4 hours (or until pork will shred easily with a fork).
- Remove pork and discard the Root Beer.
- Shred pork and place back in crock pot.
- Cover with barbecue sauce and heat through.
- Serve on your favorite slider buns.
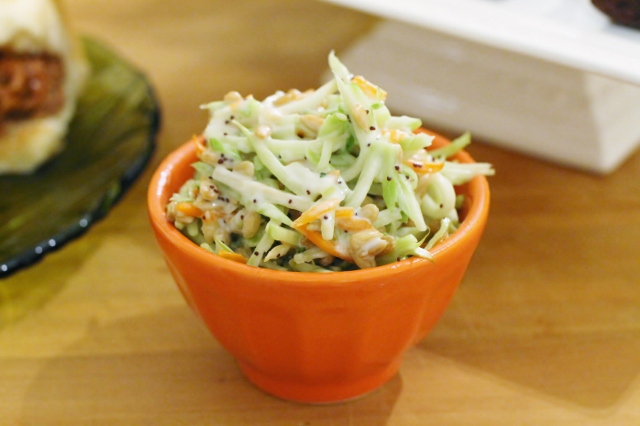 Broccoli Sunflower Seed Slaw with Poppy Seed Dressing
 Lynsie also found this recipe for Broccoli Sunflower Seed Slaw with Poppy Seed Dressing. It makes a great side dish for the pork sliders. Once again, 3 simple ingredients. We like to use Brianna's Home Style Poppy Seed Dressing but any poppy seed dressing is fine.
- 1 bag prepared broccoli slaw
- 3/4 cup poppy seed dressing
- 1/2 cup sunflower seeds
- Toss broccoli slaw and dressing in a large bowl.
- Add sunflower seeds and toss until combined.
- Refrigerate 1-2 hours or overnight before serving.
 Marshmallow Brownies
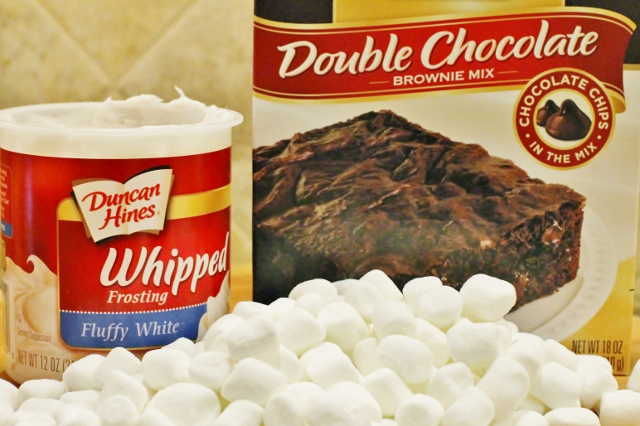 Are you noticing a pattern here? All 3 recipes have 3 basic ingredients. These marshmallow brownies are made with a boxed brownie mix (we think Ghirardelli are the best), mini marshmallows and your favorite canned frosting.
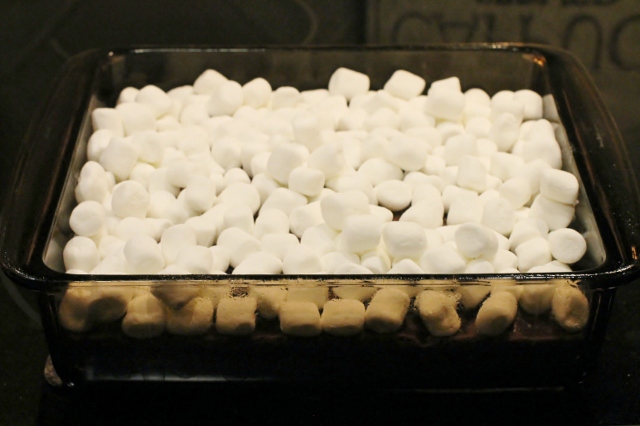 Sprinkle
 Melt
Melt
 Spread
- 1 box brownie mix (I used Ghirardelli)
- 1/2 bag or 2 cups mini marshmallows
- 1 can of your favorite frosting (I used Duncan Hines Whipped Fluffy White Frosting)
- Bake brownies according to package directions.
- Remove brownies from oven and sprinkle mini marshmallows in a single layer on top of brownies.
- Turn oven off. Put pan back in oven for 2-3 minutes or until marshmallows melt and come together (watch them closely).
- Remove from oven and cool completely.
- Spread frosting over marshmallow.
- Cut into squares to serve.
I could also call this group of recipes the "easy way out" menu because that's exactly what they are, easy. And what's wrong with that? Now you will have more time to enjoy your family and friends instead of hanging out in the kitchen waiting for everything to be done! Isn't that more fun? I think so.
Have fun!
Leslie xox
Homemade Granola Recipe
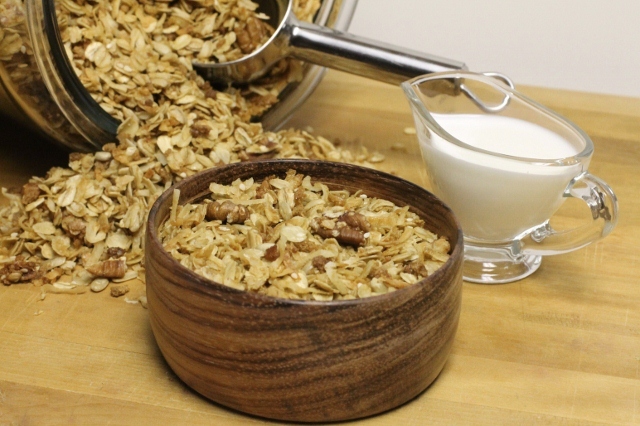 Granola is a food that is considered to be healthy by some and not so healthy by others. It is made with whole grains, nuts and fruit but can be loaded with fat and artificial sugar. I personally love granola. I am especially fond of the homemade kind you can find at a good bakery or cafe. My most recent discovery was at The Bakers Table in Lancaster, PA. Awesome little bakery, amazing homemade granola. I have the attitude that moderation is key when it comes to granola and I enjoy it in small quantities. My sister, Leigh Ann, shared her recipe for homemade granola with me a few years ago. It's one of the healthier versions I have found that still tastes really good. It's made with molasses which gives it a great flavor and it's light and crunchy making it a perfect topping for fruit or yogurt.
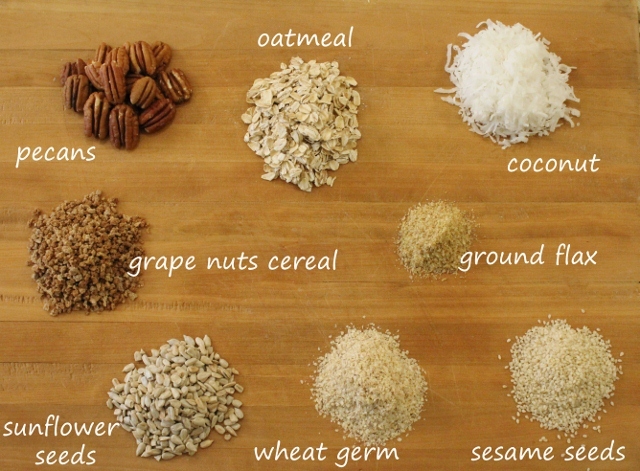 These are the main ingredients that make up the batch of granola I made for this post. What's great about granola, is that you can customize it with ingredients that you prefer. Feel free to use your favorite grains and nuts. This recipe calls for pumpkin seeds. I did not add them this time (because I forgot to!).
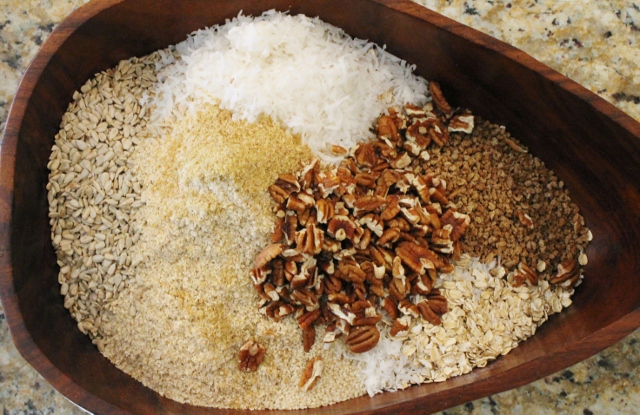 This recipe makes about 25 cups of granola, which is A LOT! You will need a very large bowl to mix all of the ingredients. I have a huge wooden bowl that I like to use. A roasting pan or baking trays would work too.
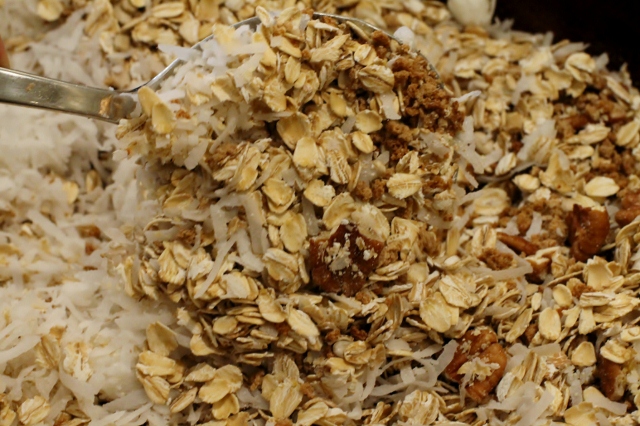 Toss all of your dry ingredients together.
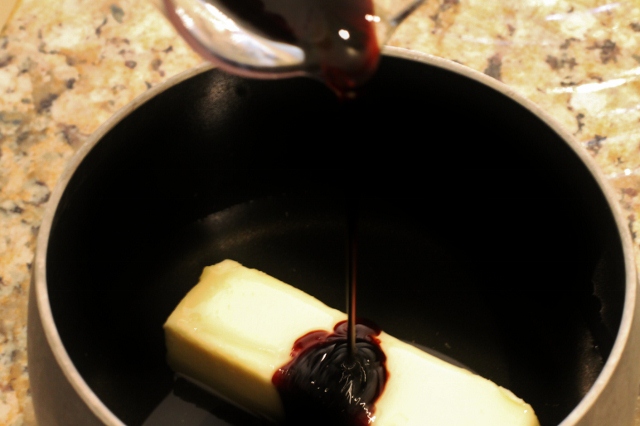 The wet ingredients are blended over low heat before they are added to the granola.
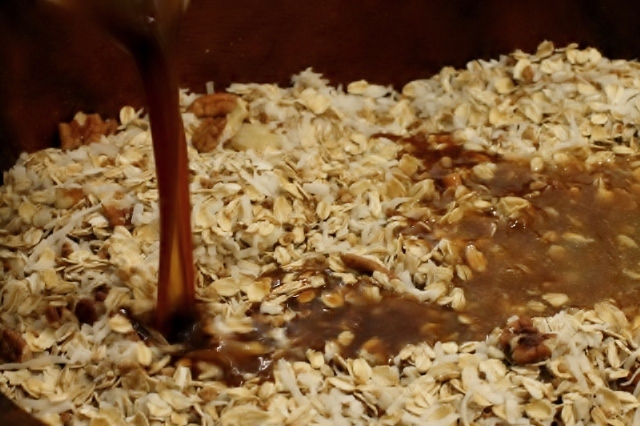 The melted molasses mixture is added to the dry ingredients.
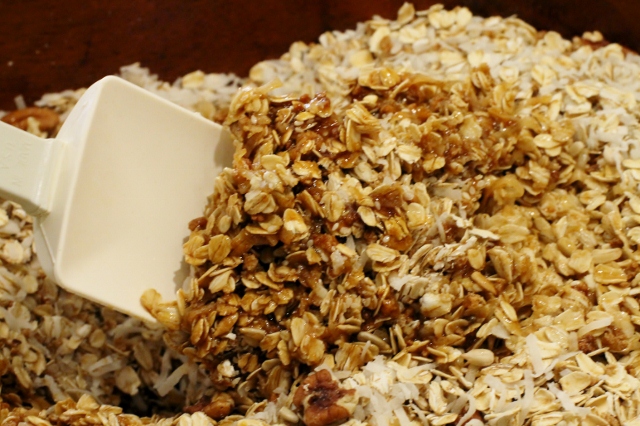 Toss all ingredients until well coated and place on baking sheets.
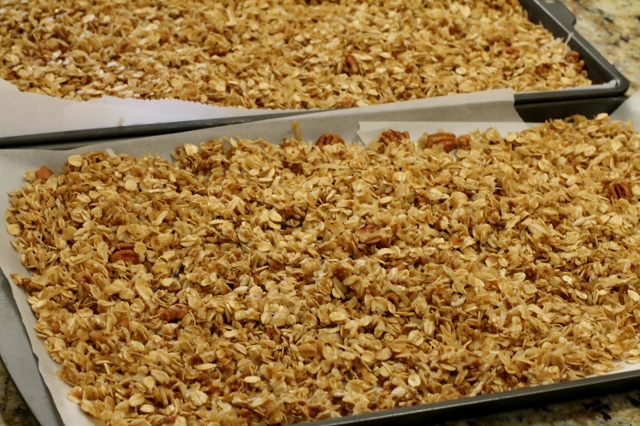 Bake at 325 degrees until granola is golden brown.
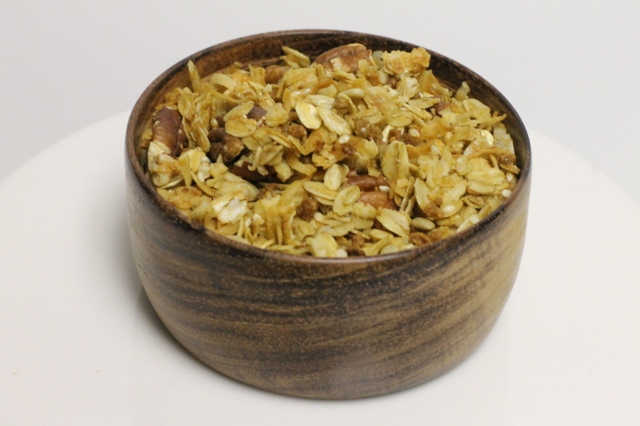
As I said earlier, this recipe makes a huge batch of granola so it's a fun thing to do with a buddy. My sister and I used to make it together and share it. She is now living on the West Coast so I either have to ship it to her or share it with my friends! Good thing it will stay fresh in an airtight container for a while!
Enjoy!
Leslie xo
- 3/4 cup canola oil
- 1 stick of butter
- 1/4 cup molasses
- 1 tablespoon vanilla
- 3/4 cup honey
- 1/2 teaspoon salt
- 2 pounds (approximately 12 cups) oats
- 1/2 cup sesame seeds
- 1 cup of your favorite nuts (almonds, pecans,walnuts)
- 2 cups Grapenuts cereal
- 1 cup wheat germ
- 1 pound coconut
- 1 cup sunflower seeds
- 1/2 cup pumpkin seeds
- sprinkle of flax seed (ground or whole seed)
- assorted dried fruit (optional)
- Preheat oven to 325 degrees. Line baking sheets with parchment paper.
- Melt first six ingredients in a pan over medium-low heat.
- Mix remaining dry ingredients in a large mixing bowl.
- Pour melted liquid over the dry ingredients and gently mix until the dry ingredients are evenly coated.
- Spread mixture (in small batches) on baking sheets. Bake, stirring every 5 minutes, for 20 minutes or until golden brown.
- Cool completely.
- Dates or dried fruit can be added after the granola cools.
Photos by Leslie Reese
Small wooden bowl handmade by Michael Reese
Florentine White Bean Soup
 January is a great time to take a break from the things we so easily indulged in throughout the holidays. If you are anything like me you have eaten your fair share of holiday cookies, cakes and dips and are ready to put the breaks on. It's time to slow down, feel lighter and eat a little healthier. Don't get me wrong, this is not a resolution or extreme plan to give up the things I love (I am a realist here). It's just my way of getting back on track and staying in control.
During the winter months, soup is a great go-to for my family. It's quick and easy and perfect for cold days and busy weekends. My sister gave me her recipe for Florentine White Bean Soup last year and it has become one of my favorite soups to make. I love it because you can easily customize it to your family's taste by changing the ingredients. You can add pasta or potatoes, kale or spinach, or whatever your favorite soup ingredient may be.
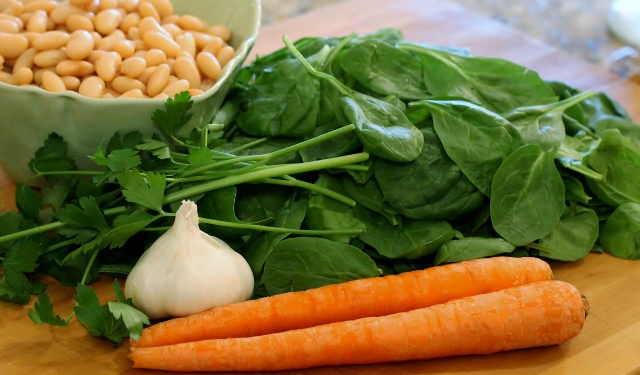 This soup is made with fresh vegetables, garlic and herbs, so it's healthy and delicious. There is pancetta in the recipe but it's a small amount and it gives the soup a great flavor. You can substitute bacon if you prefer.
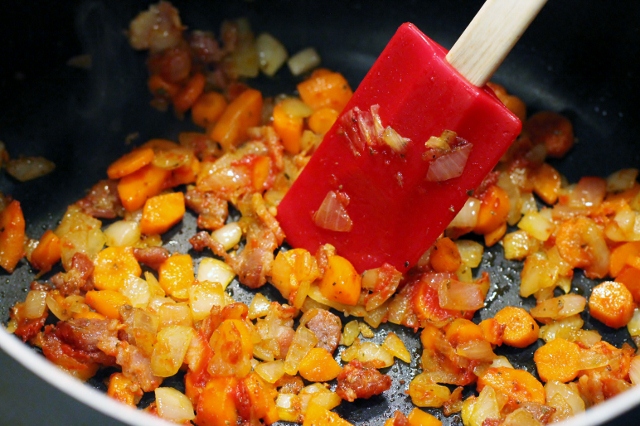 Sauteing the vegetables and pancetta in olive oil before adding broth really brings out all of the different flavors. I actually start most of my soups this way. It's makes a huge difference in the taste.
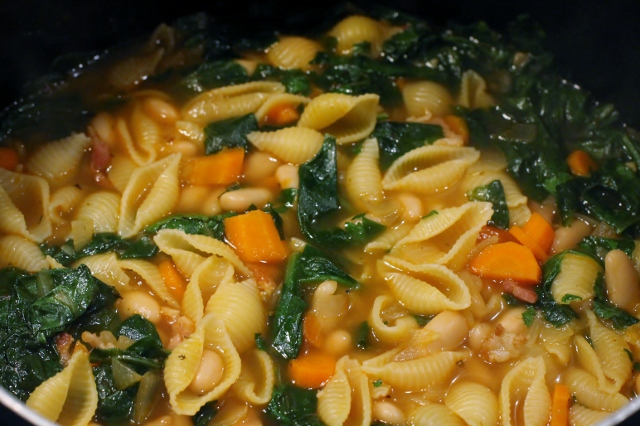 As you can see, I don't put a lot of broth in my soup. If you want more you can simply add more while it's cooking. I will often add more the next day when I reheat it, especially if it has pasta in it since the noodles absorb the broth. Try making the recipe the way it's written and then make changes once you've tried it. And if you come up with an amazing variation I would love to hear about it!
Happy cooking!
Leslie xo
- 2 tablespoons olive oil
- 3 ounces pancetta or bacon, chopped
- 1 small onion, chopped
- 2 carrots, chopped
- 1-2 garlic cloves, chopped
- 1/2 teaspoon dried oregano
- 1 tablespoon tomato paste
- 4 cups (1 carton) chicken broth
- 1 1/2 cups water
- 2 cans small white beans (Cannellini)
- 2 cups baby spinach, chopped
- salt & pepper
- 2 tablespoons fresh parsley, chopped
- *optional ingredients - small pasta, diced potatoes
- Heat oil in a large pot over medium/low heat until warm. Add pancetta and saute until slightly browned, 5 minutes.
- Raise heat to medium, add onion and carrots and saute until soft, 5 minutes.
- Add garlic and oregano, stir until fragrant, 2 minutes.
- Stir in tomato paste, mix well. Add broth, water and beans. Raise heat to medium/ high and bring to boil, then reduce heat to medium.
- Add spinach and cook until wilted and flavors have blended, 10 minutes.
- Season to taste with salt and pepper. Sprinkle with parsley.
- Serve
Here's what's coming up...
You can put any content in here.