

Simple Macrame Bracelet DIY
 For many of us, it would be very easy to complain about this long, cold winter that seems to be never ending. But, if you try to find the good, you might say one of the advantages to being stuck inside is having the opportunity to work on projects. Of course we have choices... organizing random things and cleaning out closets or dabbling in a little DIY. This week I chose DIY.
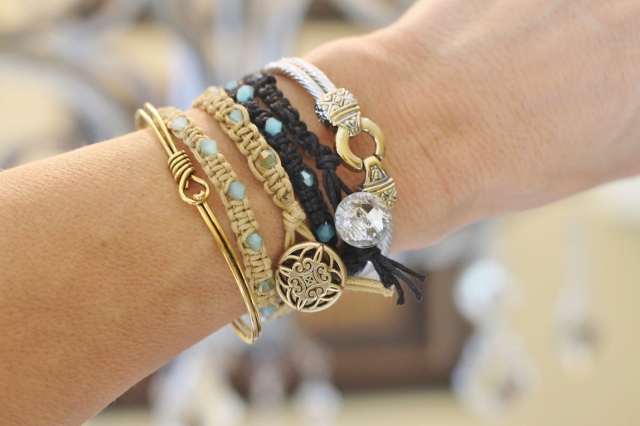
The other day I was in the mood to play around with some of my jewelry supplies. I wanted to do something simple that didn't take a lot of time so I decided to whip up a few bracelets, macrame style. And when I say, whip up, I mean it. Macrame is a simple project that anyone can do, including kids! Perfect for a rainy, or in my case, snowy day!
 I love unique jewelry, especially bracelets that can be stacked together. This project is a very inexpensive way to add to your arm party! I don't really have a specific method for this because I just sat down and started playing but I'll give you a very simple overview of what I did.
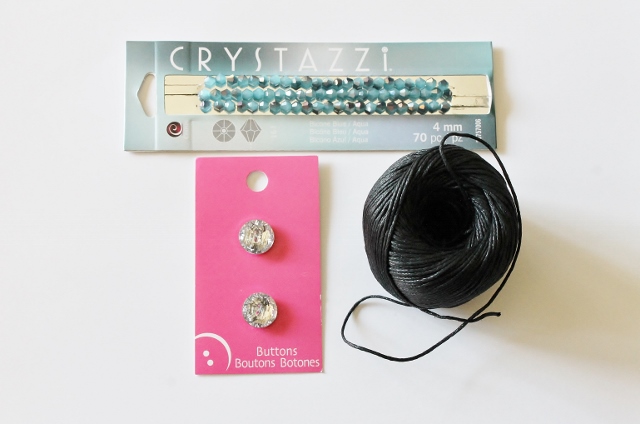 I started with just a few supplies: skinny waxed cotton cord, small crystal beads and some crystal buttons for the toggle clasp.
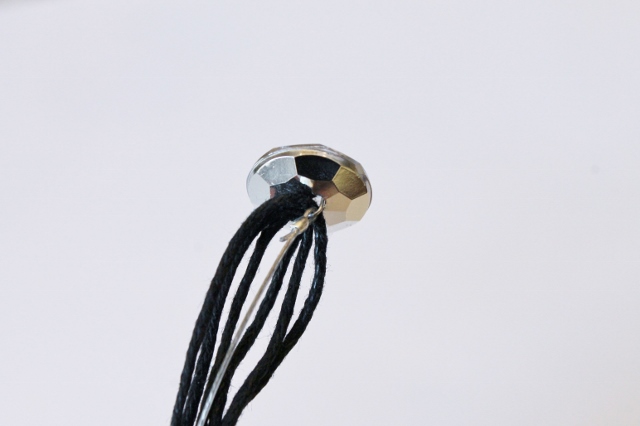
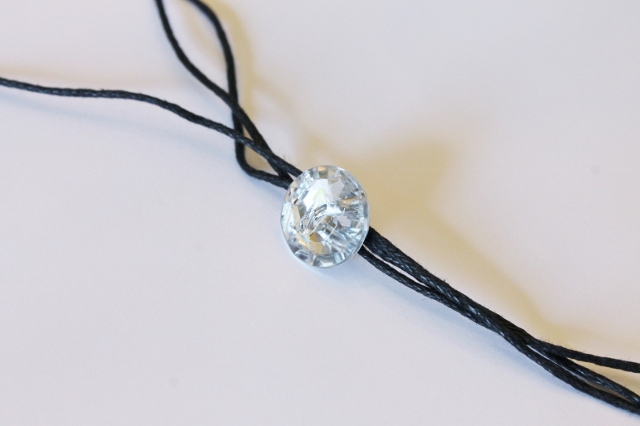 I threaded 4 very long strands of cord (more than double the length of the actual bracelet I was making) through the back of the button. The type of button I chose had a wire loop on the back which made threading easy. Standard buttons won't work.
 I wanted to use small beads that could not be strung onto this cord so I added a piece of jewelry wire to the button. To keep it simple use beads that are large enough to thread onto the cord.
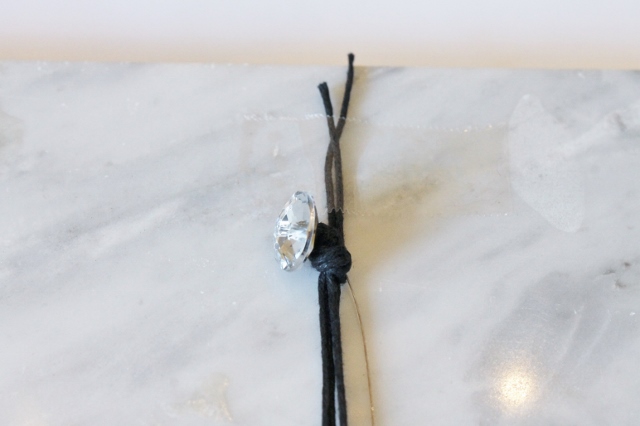
I tied a knot at the end of the cord right under the button. Instead of cutting the excess cord, I taped it to a work surface to make knotting and beading easier.
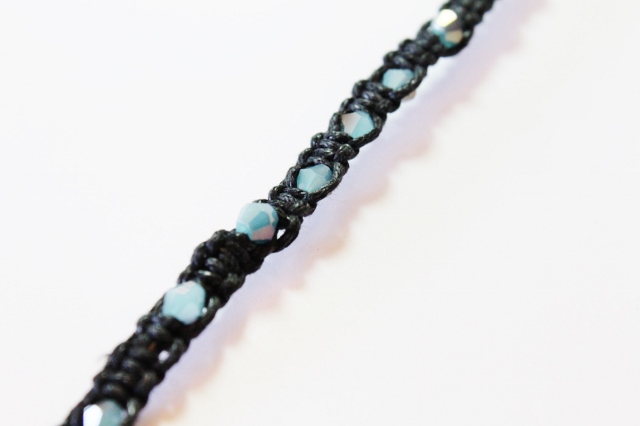
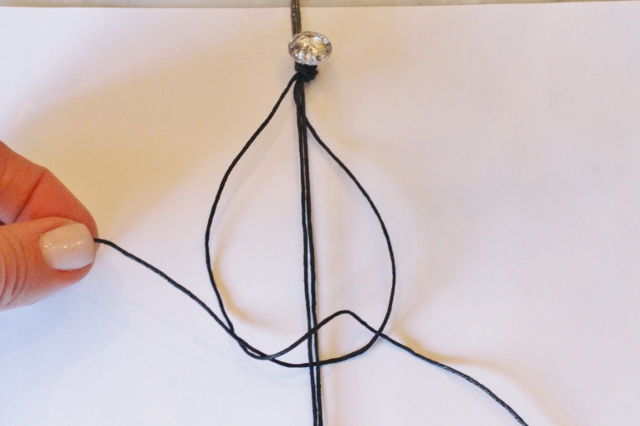 I began to tie square macrame knots alternately with the outside strands of cord. The middle strands stay stationary through the entire process.
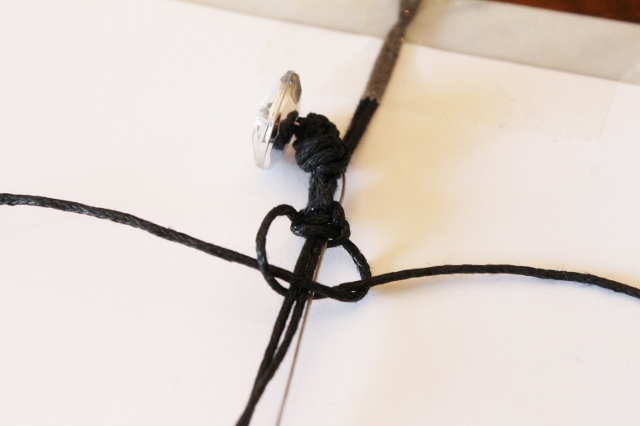
 After several knots were tied I added a bead. I tied the next knot right around the bead. If you are not using jewelry wire you will thread your beads onto the middle strands of cord.
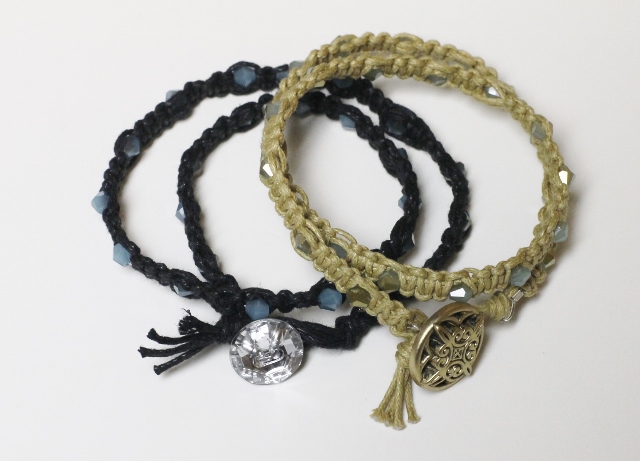
 I didn't count knots or beads so there is no rhyme or reason to these particular bracelets. You can always make patterns and count knots if you prefer a more uniform look. I was going for a less structured piece.
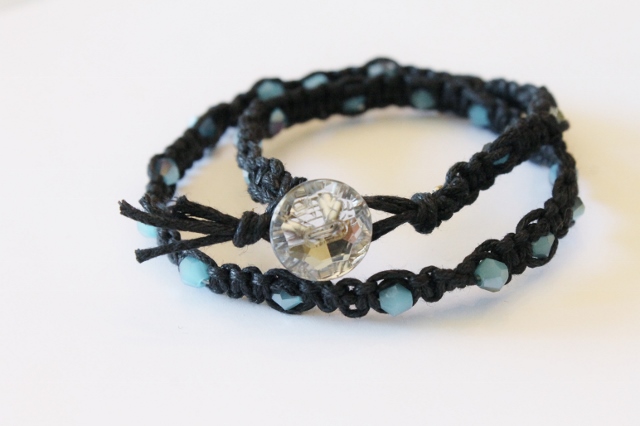
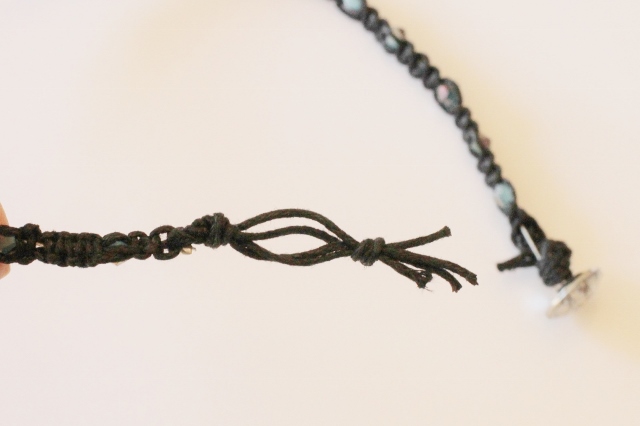 Once the bracelet was the length I wanted, I created a loop at the end of the cord that would fit over the button to close the bracelet.
That's it! It really is easy but if you find these steps hard to follow and you need more help, you can find plenty of tutorials on Macrame on Pinterest or the internet! Try your own technique to make a more personalized piece. You really can't go wrong!
Have a wonderful weekend!
Leslie xo
Wine Label Coasters - DIY
 Today I am sharing a DIY with you that I came up with in the wee hours of the morning while I was lying awake in bed thinking. Don't you love when that happens? I do! I had been planning to make some coasters out of ceramic tiles and pretty paper. I was trying to come up with a unique way to do it and for some reason, I thought it might be fun to use wine bottle labels. Many of us save the corks from our favorite bottles of wine. I love that idea and I do it too, but what about the labels? Would that work on a coaster? It did work and I am going to show you what I did but I am also going to warn you, it wasn't that easy to get some of the labels off of the bottles! What seemed like a perfectly good idea in the middle of the night, turned into a tedious project that I was determined to complete but might not do again anytime soon. I do love how they turned out though so it was worth the effort.
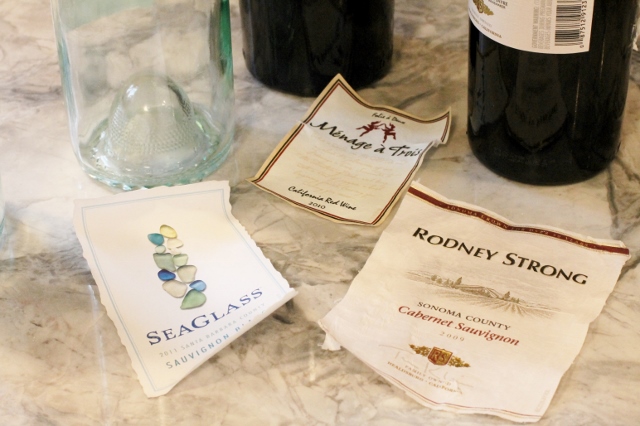
 This is a project that takes some time because you will be removing labels from empty bottles. Some of them will come off easily, others won't. In order to get several usable labels, you might go through twice the amount of bottles. I simply ran this bottle under hot water and the label peeled off without much trouble.
 I soaked this label in hot water and it still wouldn't come off so I wasn't able to use it.
 Eventually I had several labels I was able to use. If they were wet I waited for them to dry completely before I continued.
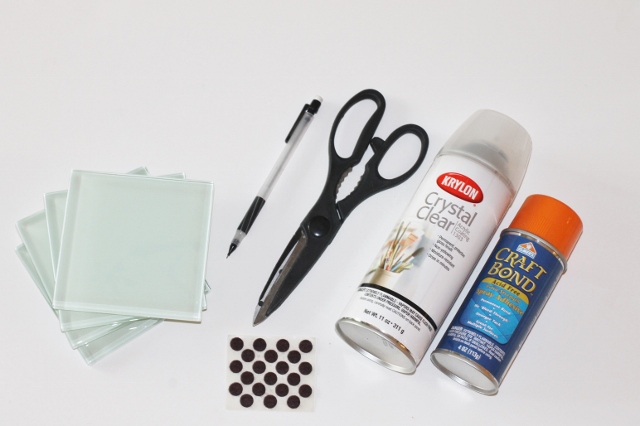 To make the coasters I used 4" X 4" glass ceramic tiles I picked up at Home Depot, Extra-Strength Spray Adhesive to attach the labels to the tiles, Crystal Clear Acrylic Coating to form a water-resistant surface on top of the tile, and felt pads for the bottom of the tiles.
 Some of the labels were bigger than the tiles so I marked them with a pencil once I placed them where I wanted them.
 I cut off the excess label.
 I flipped the label over and carefully sprayed it (in a well ventilated area) with adhesive. There were a few labels that still had adhesive on them after they were peeled from the bottle but I sprayed those too to make sure they didn't lift from the tile.
 Once the label was sprayed with adhesive I immediately placed it on top of the tile moving quickly to put it in place. This is when I realized just how sticky and permanent spray adhesive is! If you do this, be careful. Cover your work area and if you touch the adhesive, like I did, and it gets all over your fingers, you can use baby oil to remove it. I was being a bit of a reckless crafter here! I get a little excited and move too fast at times! Oops...
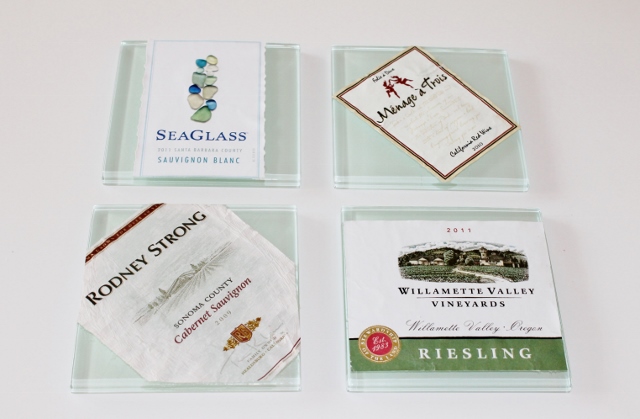 Eventually I had four labels glued onto the tiles. I decided that was enough to make a set of coasters.
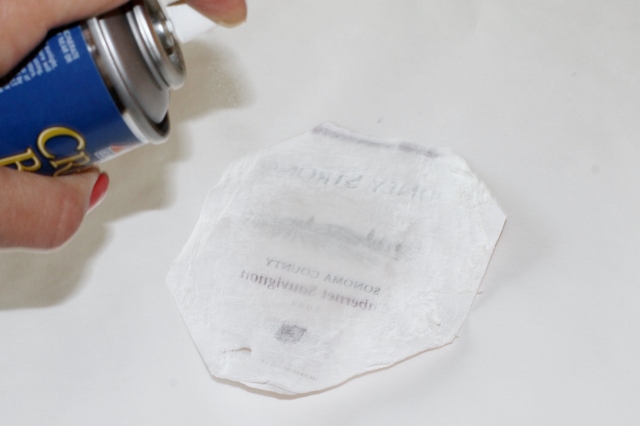
 I sprayed the top of the tiles with Acrylic Coating (again, in a well ventilated area). I waited for it to dry and repeated the process numerous times until the labels were well coated and the tiles had a nice shiny surface.
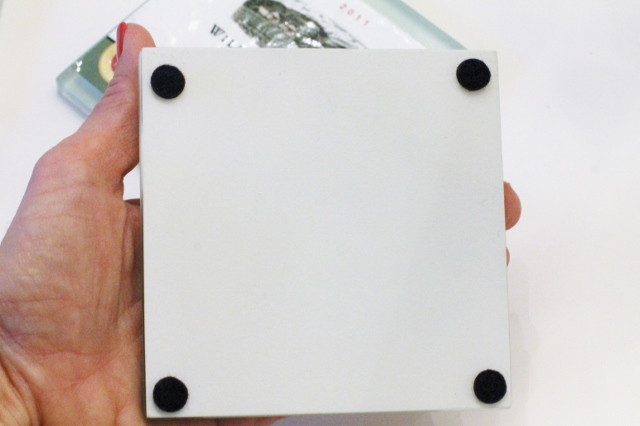 After the tiles were completely (and I mean completely) dry, I flipped them over and attached four felt pads to the bottom of each one.
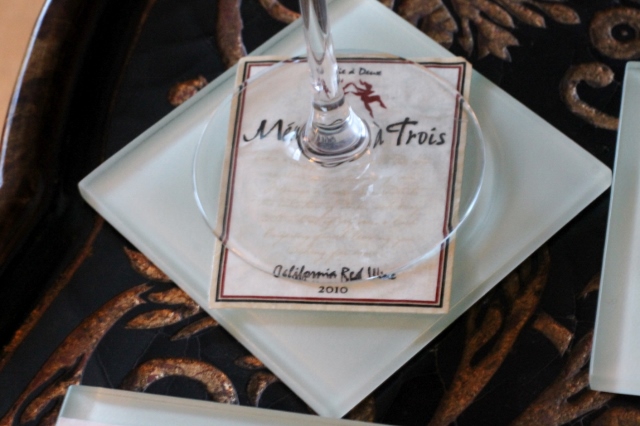 I now have a set of coasters that are not only fun to use but make great conversation pieces. Each one tells a different story or has a special memory and for that reason, I loved creating them.
I did, however, learn a few things in the process that I think are worth sharing...
There are a million ways to remove wine bottle labels on the internet. Everything from soaking to buying special products. If you choose to do this, just Google it to find the best methods.
Spray Adhesive is serious stuff. Period.
Layers of Acrylic Coating need plenty of time to dry (especially if you don't want your wine glass sticking to it). If you think it's dry, it probably isn't.
Patience is a virtue.
It may not seem like it, but I want you to try this project. I just want to be honest about my experience. Basically, I got an idea, tried it, and learned a lot. Bottom line- I LOVE these coasters.
Be brave and try it! And by all means let me know if you do! I can't wait to hear all about it!
Leslie xo
Marble Cheese Board DIY
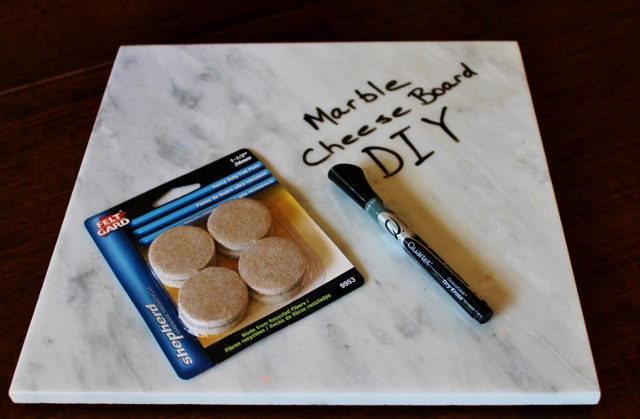 A couple of weeks ago I shared a simple cheese board idea with you. I used an old cutting board, covered it with brown paper and added some of my favorite foods. It was quick and easy and made a perfect happy hour display. Today I thought I would show you how you can make your own cheese board using a piece of marble tile. It's ridiculously easy to do and very inexpensive. I don't think I spent more than ten dollars on this project!
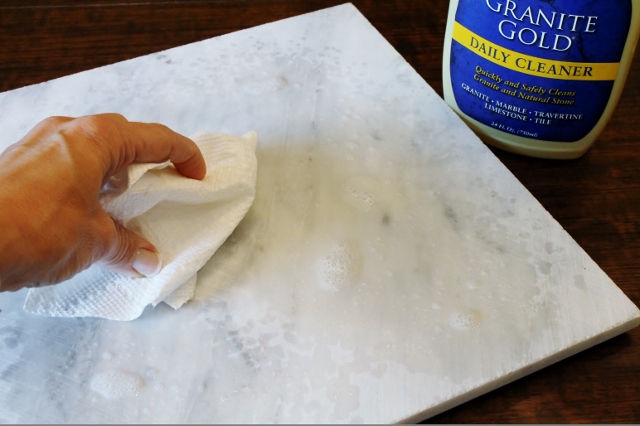 I went to Home Depot and picked up a 12 x 12 piece of white marble tile in the flooring department for $3.99. I cleaned both sides of the tile with a product I use on my granite kitchen counters. You can use soap and water or anything that is safe for marble. The point is to get all of the powder and dirt off of the tile before you use it.
 I also bought a pack of 1 1/2 " heavy duty felt pad circles with adhesive backs at Home Depot. They cost $2.67.
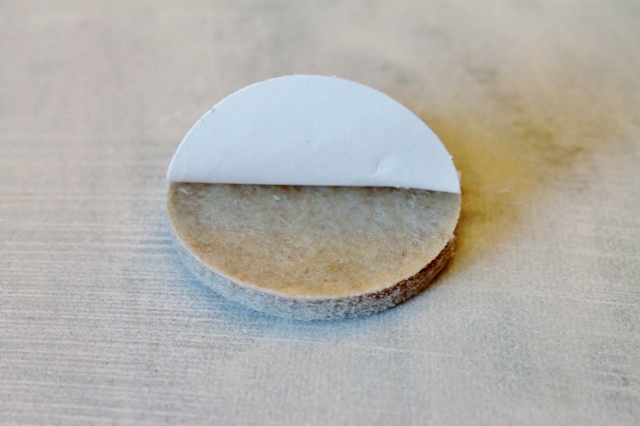
 Place a felt pad, sticky side down, in each corner, on the rough side of the tile.
 The felt pads will keep the tile from scratching tables and counters and will also give the tile a little lift so it's easier to pick up.
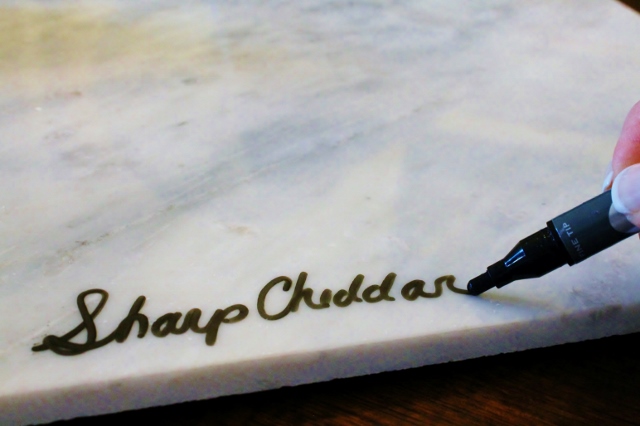 Flip the tile over and it's ready to use. Wipe it clean with a damp cloth or soap and water before you place any food on it. You can label your cheeses with a dry erase marker*. It will wipe right off when you are done! It's a little variation from the slate and chalk cheese boards that are so popular.
 That's it! You now have a marble cheese board to serve your cheese and crackers and it only cost a few dollars! I can't think of an easier way to make something so useful. I plan to pick up a few more tiles so I can use them for a larger party. I think it would be fun to place them at different levels on a table for an eye catching appetizer display.
Have fun!
Leslie xo
*Please keep in mind that the tile used in this DIY is a simple marble floor tile. Marble is porous and I cannot guarantee that the dry erase marker will not stain any area of the tile. Test a small spot first before proceeding. I had no trouble with my tile staining. I wrote on it and erased repeatedly. Do not submerge tile in water once the felt pads are secured to the tile. Clean surface with soap and water.
Vintage Inspired Easter Egg DIY
 Today's post has a bit of nostalgia attached to it. As you may know, I am a person who loves holidays, tradition and the joy that comes with celebrating the little things in life. When we decorate for a holiday, some of the best memories are recalled when we unpack things that have been carefully tucked away for the past year. Whether it's something our children made or a gift from a relative, it sparks conversation and brings back a feeling of comfort and happiness. That's what tradition is all about, the feeling of being connected to something special. In our family there is a favorite Easter decoration that has been around as long as I can remember. It's a Sugared Easter Egg that my mom made almost 40 years ago. To my sisters and me, it represents the fun we had at Easter time when we were kids. This year I thought I would try to recreate what my mom made long ago. The process was fun and made me appreciate the effort she put into creating something like this while she had 5 little girls running around!
 This is one of the eggs my mother made. I love the cellophane Easter grass and the little vintage rabbit inside. I remember watching her make these eggs when I was little. She was like the Martha Stewart of the 70's. She would give them as gifts to friends and a few of our favorite teachers. We laugh now at the thought of carrying one of these into the school!
 My mom didn't save the recipe or how-to for these eggs. They are different than the ones you might see today on Pinterest. Instead of using liquid starch these eggs are made with a blend of sugar and glue to make them stronger and give them a more textured look. I used Mod Podge, a balloon, and colored string (all from Michael's craft store).
 I carefully wrapped string around an inflated balloon. I started at the top and went all the way down and around a few times. Then I started wrapping in different directions. It's a little tricky at first but once the string goes around a few times it stays in place nicely. You don't have to completely cover the balloon.
 I suspended the balloon from the light over my table with some of the string. It was the easiest way to apply the sugar mixture and also allowed the balloon to keep its egg-like shape. If you can't do it this way you can suspend the balloon from a hanger on a kitchen cabinet or anywhere you have room.
 I mixed equal amounts of sugar and Mod Podge in a container and spooned it onto the top of the balloon. It goes on thick so I used a sponge brush to spread the mixture out and make sure most of balloon was covered. You will need to handle the balloon while you are doing this so it's a good idea to have a wet cloth handy to wipe off of your hands when you're finished with each layer.
 The excess mixture dripped into the pan. I waited for the first coat to dry almost completely before I added another layer. It's best to work in small batches so the glue doesn't dry out while you wait. Cover any leftover glue and rinse out the sponge while you wait for each layer to dry. I repeated this process until the balloon was almost completely covered and I had a texture I liked. This took almost 2 days.
 When the coating on the balloon was dry and firm to the touch it was ready for the next step.
 I popped the balloon with a pin to release it from the string. It's so cool to watch what happens when you do this. If you have kids let them watch you do this step.
 The balloon will be stuck inside the egg and may be in two pieces.
 There will be a hole at the top of the egg where the balloon was knotted. Hold the egg upside down so that the balloon falls to the bottom and pull it through the hole. You might need to use tweezers to do this. You will notice that the balloon is wet. The inside of the egg will still be a little bit sticky.
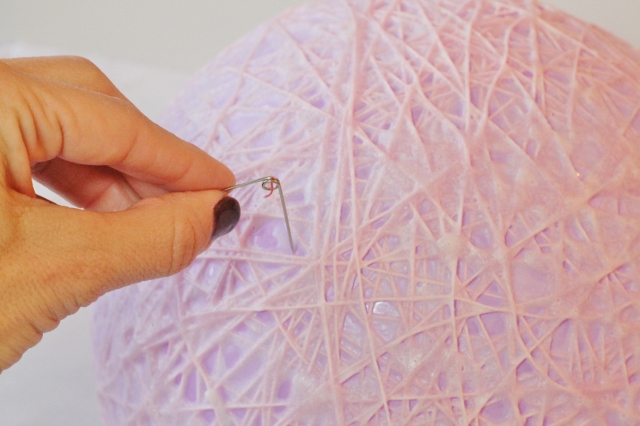
 I cut a hole in the front of the egg with a pair of sharp scissors. If you aren't good at estimating you can draw the opening with a pencil first. Do this right away since the inside of the egg is still slightly pliable. Once you are finished stand the egg up on hard surface so the bottom dries flat.
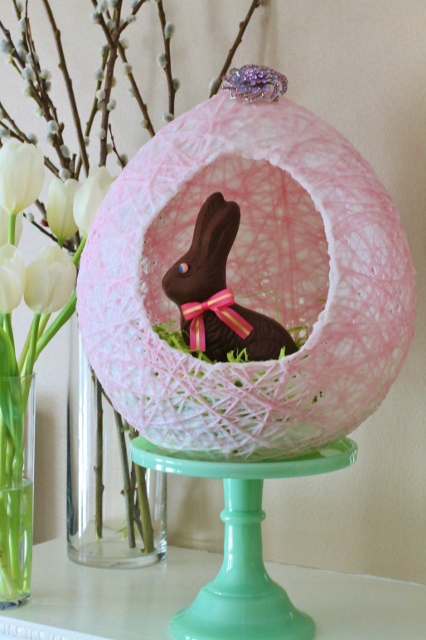
 Instead of using lace like my mom did, I softened the cut edge in the opening of the egg by brushing it with a little bit of glue and sprinkling it with sugar. I filled it with a newer version of Easter grass and placed a chocolate rabbit inside.
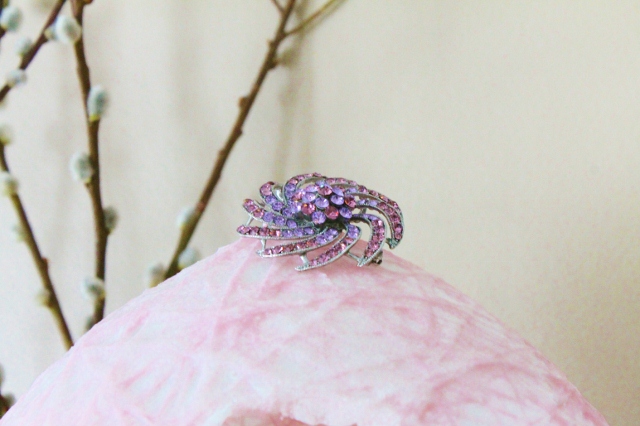 I added a little bit of bling to my egg by placing a pretty crystal broach in the hole at the top of the egg instead of ribbon.
 I love looking at these eggs side by side. Not only is it fun to see how things change over time but it's awesome to think about what something so simple can represent; forty years of memories and tradition that will live on for many years to come. So what may look like a simple little Easter craft is really one of those little things in life that is definitely worth celebrating!
Have a beautiful day!
Leslie xo
Simple Painted Bar Glasses - DIY
 This past week I was browsing Pinterest and I came across some interesting painted bar glasses. They were similar to glasses you would find at Anthropologie and I loved them. As usual, I had the urge to "make something" so I thought I would give them a try. They looked easy to make and since I have more on my to-do list than I have hours in a day, I figured it would be a perfect project to satisfy my creative mood, without throwing me too far off track. I grabbed some stemless wine glasses from the bar, picked up some paint and got busy. It was a simple project and I love how they turned out! I'll show you what I did.
 I used glasses that I already had at home. You can buy inexpensive glasses in places like Target or Walmart. The glasses from Anthropologie were speckled in bright colors. I decided to jazz my wine glasses up with metallic paint instead. I picked up some Martha Stewart Acrylic Craft Paint (multi-surface) at Michael's in 3 different colors, Pale Bronze, Brushed Bronze and Sterling.
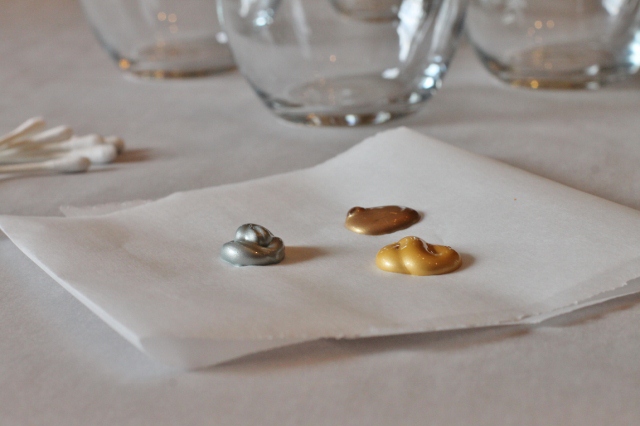 I worked on a large sheet of parchment paper. I know it's made for baking but I have tons of it and it works well for small projects. I squeezed quarter sized amounts of paint onto the paper. I added more when I needed it. That way it didn't dry out too quickly.
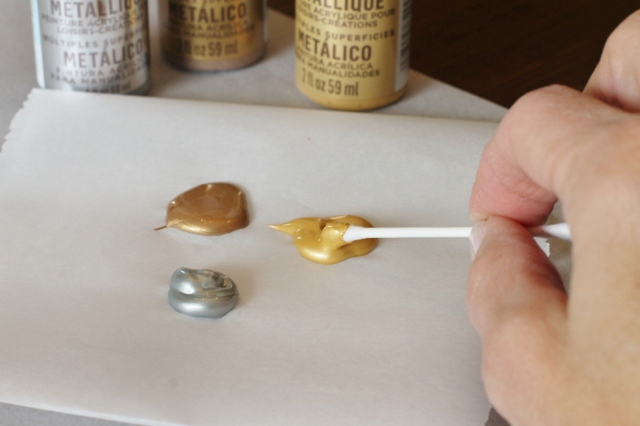 Using a Q-tip, I just started randomly painting little dots and smudges all over the bottom half of the glass.
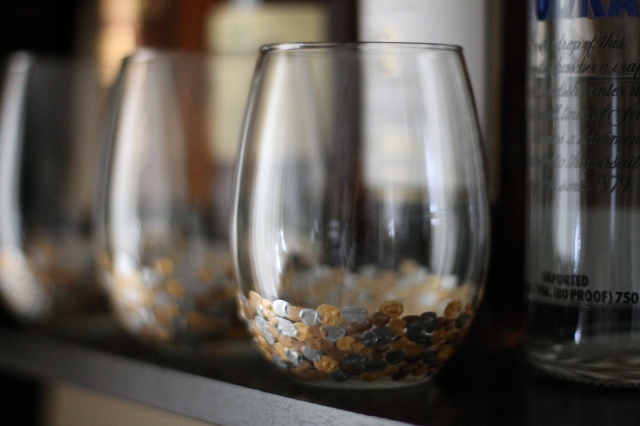
 I worked with one color at a time and painted all four glasses, then started over with the next color. That way the paint had time to dry between each color and kept the dots from blending together.
 I created the look I wanted by layering the paint colors. When I finished painting the glasses, I let them sit for a day to dry. The Martha Stewart paint that I used needs to cure for 21 days and then the glasses will be top-rack dishwasher safe. I wanted to use my glasses the next day so I carefully hand washed them. They were fine. I probably won't ever put them in the dishwasher. Make sure you check the directions on your bottle of paint so you know how to care for your glasses.
 What's fun about this project is there really isn't a right or wrong way to do it. It's a quick and easy way to turn something ordinary, like an inexpensive glass, into something that makes pouring a drink a little more fun!
Cheers!
Leslie xo
Gingerbread Church
") About twenty years ago, when my kids were little, I decided to try to make a gingerbread house. I loved to bake and I was pretty crafty so I figured it was worth a shot. I found instructions for a simple gingerbread house in a Martha Stewart Living Holidays book and the rest is history. I loved every step of the process and for years to come, I made a gingerbread house every Christmas. Then life got hectic, the kids got older (I know, shouldn't it be the other way around?) and I sort of fell off the gingerbread wagon. Well, this year I decided to jump back on so I got out my books, pulled the patterns out of the recipe cabinet and went to work. What I realized was, it's not hard to make a gingerbread house but it is time consuming. I forgot that part. I also realized I'm a little rusty. I made a few mistakes (I won't point them out) but I am in love with my gingerbread church and it feels like the good old days when there was one in the house every Christmas.
About twenty years ago, when my kids were little, I decided to try to make a gingerbread house. I loved to bake and I was pretty crafty so I figured it was worth a shot. I found instructions for a simple gingerbread house in a Martha Stewart Living Holidays book and the rest is history. I loved every step of the process and for years to come, I made a gingerbread house every Christmas. Then life got hectic, the kids got older (I know, shouldn't it be the other way around?) and I sort of fell off the gingerbread wagon. Well, this year I decided to jump back on so I got out my books, pulled the patterns out of the recipe cabinet and went to work. What I realized was, it's not hard to make a gingerbread house but it is time consuming. I forgot that part. I also realized I'm a little rusty. I made a few mistakes (I won't point them out) but I am in love with my gingerbread church and it feels like the good old days when there was one in the house every Christmas.
 There are a lot of great resources to get you started. I am partial to books, probably because I like to collect them, but there are plenty of resources online.
") Decide what you want to make and cut out the pattern ahead of time. As you might imagine, this part is time consuming. Once you are done making your gingerbread house, save the pattern. If you ever want to make it again, you will be glad you have it.
Decide what you want to make and cut out the pattern ahead of time. As you might imagine, this part is time consuming. Once you are done making your gingerbread house, save the pattern. If you ever want to make it again, you will be glad you have it.
 When you are ready to get started, make your dough. I have a great Gingerbread Dough Recipe below.
") Roll your dough and cut out your pattern.
Roll your dough and cut out your pattern.
") It's not easy to move a piece of dough this big once you roll it out and cut it so I cut my gingerbread right on the parchment paper it will bake on. I slide a flat edge baking sheet under the paper when I'm done cutting and put it in the oven.
It's not easy to move a piece of dough this big once you roll it out and cut it so I cut my gingerbread right on the parchment paper it will bake on. I slide a flat edge baking sheet under the paper when I'm done cutting and put it in the oven.
") Once the gingerbread is baked, I slide the entire sheet of parchment paper right onto a rack to cool.
Once the gingerbread is baked, I slide the entire sheet of parchment paper right onto a rack to cool.
") To make stained glass windows, I baked the gingerbread 2/3 of the way and then took it out of the oven to fill the windows with crushed sour balls in different colors. I put the pan back in the oven to finish baking and to melt the candy.
To make stained glass windows, I baked the gingerbread 2/3 of the way and then took it out of the oven to fill the windows with crushed sour balls in different colors. I put the pan back in the oven to finish baking and to melt the candy.
") Once all of the pieces were baked, I spread them out on a table. It's easier to put your structure together if you are organized.
Once all of the pieces were baked, I spread them out on a table. It's easier to put your structure together if you are organized.
") Royal Icing is used to "glue" the pieces together. My favorite Royal Icing Recipe is below. I used a wooden board covered in brown paper as a base for the church.
Royal Icing is used to "glue" the pieces together. My favorite Royal Icing Recipe is below. I used a wooden board covered in brown paper as a base for the church.
") I piped icing through a decorating bag with a round tip attached to construct the walls. It makes it easier to place the icing where you want it to go.
I piped icing through a decorating bag with a round tip attached to construct the walls. It makes it easier to place the icing where you want it to go.
") Start by securing one wall and carefully build from there. Royal Icing is thick and drys fast so the walls tend to stand on their own pretty easily.
Start by securing one wall and carefully build from there. Royal Icing is thick and drys fast so the walls tend to stand on their own pretty easily.
 Pipe thick lines of icing on the inside of the house.
") I switched to a star tip to go over the icing on the outside edges. It looks prettier than a straight line.
I switched to a star tip to go over the icing on the outside edges. It looks prettier than a straight line.
 Once the walls were standing and dry, I decorated the outside with the Royal Icing.
") I did this before I put the roof on.
I did this before I put the roof on.
") I added some holiday decorations with colored icing and candy.
I added some holiday decorations with colored icing and candy.
") I decided to make chocolate shingles for the roof. I simply melted chocolate and spread it out on a tray covered in parchment paper. I put it in the freezer for about 15 minutes so the chocolate could harden slightly.
I decided to make chocolate shingles for the roof. I simply melted chocolate and spread it out on a tray covered in parchment paper. I put it in the freezer for about 15 minutes so the chocolate could harden slightly.
 (628x307)") When the chocolate was hard, I cut it into small squares to make shingles and then broke them apart. You have to work fast when you do this because the chocolate will soften as you handle it.
When the chocolate was hard, I cut it into small squares to make shingles and then broke them apart. You have to work fast when you do this because the chocolate will soften as you handle it.
") Starting with the bottom edge and working in rows, I tiled the roof with chocolate shingles. I placed them swirled side up because I like the way it looked.
Starting with the bottom edge and working in rows, I tiled the roof with chocolate shingles. I placed them swirled side up because I like the way it looked.
") I love to light up my gingerbread houses. I placed battery operated LED lights inside the church. Some patterns do not include a hole for lights so if you want to add lights, remember to cut a small hole in the back of the house before you bake it.
I love to light up my gingerbread houses. I placed battery operated LED lights inside the church. Some patterns do not include a hole for lights so if you want to add lights, remember to cut a small hole in the back of the house before you bake it.
 Finally finished!
Happy Holidays!
Leslie xo
- 6 3/4 cups flour
- 1 tablespoon cinnamon
- 1 1/2 teaspoons ginger
- 1/2 teaspoon salt
- 1 1/2 cups light corn syrup*
- 1 1/4 cups packed light brown sugar*
- 1 cup margarine
- Preheat oven to 350 degrees.
- Stir the dry ingredients together in a large mixing bowl.
- Combine corn syrup, brown sugar, and margarine in a 2 quart saucepan. Stir constantly over medium hear until margarine is melted.
- Stir the liquid into the flour mixture in an electric mixing bowl with paddle attachment. Mix on medium to high speed until well blended. Dough will become very stiff.
- Form dough into a ball and cover in plastic wrap.
- Refrigerate until dough is easy to handle**
- Roll dough on parchment paper about 1/8" thick and cut into desired shapes.
- Bake for 10-12 minutes or until golden brown. Check for air bubbles during baking process and prick with toothpick to deflate them ( I CAREFULLY tap them with my finger)
- Slide gingerbread onto large cookie sheet or baking rack to cool, making sure all pieces lie flat.
*Dark corn syrup and dark brown sugar may be substituted and will result in darker dough **Do not refrigerate dough more than a few minutes. You just want to cool it until it is easy to work with. This dough starts out a little sticky but becomes very pliable and is actually easy to work with. You can use a little bit of flour to get it started but after the first roll or two it will roll nicely with out it.
- 3 eggs whites at room temperature
- 1 16 oz box confectioner's sugar, sifted
- 1/8 teaspoon cream of tartar
- Place egg whites in an electric mixing bowl.
- Stir cream of tartar into egg whites.
- Add confectioner's sugar to egg whites and mix on low speed, scraping bowl, until well blended .
- Turn mixer on high and beat until mixture is thick and white and holds stiff peaks about 5 -6 minutes.
- Once the icing is finished you will want to cover it with a damp cloth or plastic wrap as it will dry quickly and form a crust.
DIY Jewelry Stand
 When I was designing jewelry, I loved coming up with fun and unique ways to display it. I always felt like it was more interesting to look at when it wasn't all lined up in a box. I feel the same way about my own jewelry. I have a beautiful jewelry box where I keep good pieces of jewelry that need special care but I like to keep my fun costume jewelry on hand so I can grab what I want to wear quickly. Years ago I made my own displays using large wooden frames and wire mesh. I have simplified those displays to create a smaller version to put on my dresser. It's so simple and inexpensive to make, I thought I’d share how I did it.
You can pick up what you need at your local craft store. I don't think I spent more than $15 on this project.
Supplies:
- wooden frame ~ I bought small wooden frames at Michael's for a dollar.
- spray paint ~ I used a can of Krylon Short Cuts paint. It's a small can for only $3.29.
- wire mesh or screen ~ I had extra screen left over from a window screen repair. You can buy either at a home improvement store.
- black wooden picture easel ~ $4.99
- stapler
- scissors
- decorative gems ( optional ) ~ I found crystal buttons in my jewelry box so I used them as embellishments.
 Cover your work area (in a well ventilated room) with newspaper. I painted in my garage.
 Spray your frame with paint according to the directions on the can and let it dry.
 Once the paint is dry you can begin to assemble the jewelry stand.
 Carefully cut the wire mesh to fit the inside of the frame. You will want the mesh to be a little larger than the inside of the frame but not so large it sticks out past the edge. You will be attaching the mesh to the back of the frame.
 Carefully staple the mesh along the inside edge on the backside of the frame, keeping the staples about an inch apart.
 When you flip the frame over, it should look like this.
 If you want to decorate your frame, use hot glue or tacky glue to adhere gems to the frame.
 I hot glued crystal buttons to the sides of my frame.
 Place the frame on the easel and fill it with jewelry. I put a plain silver ring (used to make earrings) through the mesh so I could also hang my hoop earrings.
 Try personalizing your jewelry stand by using different sized frames, painting them different colors or using different easels. A jewelry stand with a pair of earrings attached makes a great gift!
Have fun!
Leslie xo
Simple Dip-Dye Scarf
 I was recently flipping through the October issue of my Martha Stewart Living magazine and was intrigued with some of the DIY projects that were scattered throughout the pages. I decided it was time to put one of them to the test to see if it really was as simple to do as they make it look. I decided to try a dyeing project. It was a how-to on creating a blue streaked scarf using a Dip-Dye method. There were very few materials or steps involved so I figured it had to be easy. I was right and the result was beautiful. Here is what I did.
 Materials I used:
- Fabric ~ I used cotton gauze fabric that was 80 inches long and 40 inches wide. I cut it in half lengthwise and had enough for two scarves. I could have also used a white scarf.
- Liquid Dye ~ I used the color Royal Blue for this scarf
- Dye Fixative
- Clothes hanger with clips
- 3 plastic bins
- Iron
 I folded my fabric accordion style and pressed it with an iron.
 I mixed the dye according to package directions in the first bin. I put plain water in the second bin and I mixed the fixative according to package directions in the the third bin.
 I folded the fabric in half width-wise and then clipped it to the hanger. I dipped the folded edge of the fabric into the first bin (the one with the dye).
 I waited for the majority of the liquid to drip into the bin before moving to the next one.
 Next I dipped the fabric into the second bin, which had plain water in it, to rinse the dye out. The dye quickly colored the water. When I put the fabric into the water past the dye line, the dye soaked up into the fabric resulting in a light blue top stripe. It wasn't intentional but I liked how it looked.
")
 Next, I dipped the fabric into the third bin. The fixative in the water sets the dye.

 When I was finished dyeing the fabric, it needed a place to dry. With gloves on, I carefully squeezed out the excess liquid. Then, I hung the clothes hanger right on the chandelier in my kitchen. It was hanging over the bin so it could drip and the table was covered with plastic and paper.

 It took about a day to dry. Once it was dry, I unfolded it and pressed it slightly.
 I love the idea of dip-dyeing. It was simple and fun. I guess those DIY projects are as easy as they look! If you want to check out the actual How-To on this project look in the October issue of Martha Stewart Living magazine or the browse the dyeing projects at Martha Stewart online.
Have fun!
Leslie xo
DIY Dessert Stand
 I've always been a creative person and I love trying new things. Last year I needed a holiday gift idea for my girlfriends and when I couldn't find what I was looking for, I thought it might be fun to make them something. I hadn't done that in a while and I was in the mood to get "crafty" so I figured it was time for a DIY project. I decided to make dessert stands so, naturally, I went to Pinterest for some ideas. There were so many different styles and techniques. People were using everything from glass and glue to wood and paint. After researching different options, I came up with a way that worked for me. My result was an inexpensive and durable, not to mention pretty, dessert stand that was easy to make and fun to use. This is how I did it.

You will need to gather some supplies:
- plastic plate ~ I bought the plate for this stand at Target. It is a 12" square. You can use any size you like.
- wooden candle holder ~ I used a 6" candle holder from Pier 1 for this stand. I have also used 12" candle holders for taller stands.
- glass cabinet knob ~ You will need a standard cabinet knob (not a drawer pull). I found them at Home Depot.
- hanger screw ~ I used a 2" hanger screw for this stand. A hanger screw is threaded on both ends (also at Home Depot).
You will also need some tools:
- drill & drill bits ~ You will need one drill bit that is slightly thinner than the hanger screw (about 1/2 the diameter) This one will start the hole for the hanger screw to go into the candle stick. You will also need a drill bit that is slightly larger than the hanger screw. This one will make the hole in the plate.
- pliers
- pencil
- measuring tape or ruler

Step 1: Working on the top side, measure and then mark the center of the candle holder with pencil.
Step 2: Carefully drill a hole straight down into the candle holder where you put the pencil mark. Hold the bottom, not the top of the candle holder with your other hand. You are just drilling a starter hole which only needs to be about 1/4 of the total length of the hanger screw.
 Step 3: Using the pliers, screw the hanger screw (the side with the large threads) straight into the hole you just made. Carefully hold onto the center of the screw with the pliers while you are turning it so you don't damage the threads.
") Step 4: Turn your plate over. Measure and then mark the center of the plate with a pencil. Keeping the plate turned over, place it on the end of a table or workbench. I highly recommend a work bench or outdoor table and not a kitchen counter or table! Holding onto one end of the plate and making SURE the middle is NOT on the table, carefully drill a hole through the center of the plate.
Step 4: Turn your plate over. Measure and then mark the center of the plate with a pencil. Keeping the plate turned over, place it on the end of a table or workbench. I highly recommend a work bench or outdoor table and not a kitchen counter or table! Holding onto one end of the plate and making SURE the middle is NOT on the table, carefully drill a hole through the center of the plate.
 If you drilled properly, you now have two pieces of a dessert stand that need to be put together. If you didn't, just try again and be glad the plates were cheap!
 Step 5: Place your plate over the screw on top of the candle holder.
 Step 6: Twist your cabinet knob onto the screw and tighten until everything is secure.
 You now have a pretty little dessert stand that can be used for serving cookies, candy or even simple hors d'oeuvres!
 It's that easy! There are so many options when you start mixing color and style. I like looking for different shapes and sizes of plates and candle holders. Since I gave my dessert stands as gifts, I wrapped them with things like dessert napkins and decorating sprinkles. It would even be fun to add recipes or a favorite batch of cookies!
Have fun!
Leslie xo
*TIP* Do not submerge your dessert stand in water. Wipe clean with a damp cloth and dry. Although you can disassemble the dessert stand, I don't recommend doing it often because the screw may become stripped after repeated knob removal. While I personally love the idea of switching out the plates, I don't think the stand would last as long if I did that.
Photos by Leslie Reese
Back to School Snack Pops

Summer is coming to an end and that can only mean one thing - school is back in session! We all know how bittersweet this time of year can be but instead of trying desperately to hang onto summer why not jump into fall and make a party out of it? After all, it’s all of the little things that add up to make great memories so why not kick off the school season with a celebration. I've got the perfect place for you to start!
As you may know, I am a contributor for a wonderful online dessert magazine, Best Friends For Frosting , where we aim to inform, excite and inspire you with all things dessert. Well, Best Friends for Frosting and Sprinkles & Grins, the online destination for Signature Brands, LLC., maker of dessert decorating products including Betty Crocker and Cake Mate frostings, icings, candles, sprinkles, and more, have officially teamed up on a back to school themed website promotion and contest – Back to School Bake-off. This awesome new website will feature recipe and party ideas contributed by an exclusive group of creative bloggers and professionals. I was thrilled to be asked to participate and I couldn't wait to get started! What’s really cool is that everyone can get involved! Not only will you find great ideas at Back to School Bake-off but there is an exciting recipe contest and you can win cool prize packs for participating! So head over to Back to School Bake-off and get your party started! I’ll see you there!
Back to School Snack Pops
I love to bake but when my kids were heading back to school and things started getting hectic I was all for whipping up something "no bake". I created these fun Back to School Snack Pops for those of you who want something fun but easy. As far as I'm concerned, snacks don't have to be difficult to be amazing. Everything I used came from the grocery store. Sprinkles & Grins has some great products to make this easy!

Alternately slide small pieces of fruit, donut holes, mini muffins, etc. onto a 6" skewer. There are no rules. Use whatever you like. As long as it fits on the skewer, it works! And by all means if you want to bake, go right ahead, otherwise stick with prepackaged items.
 Place a star tip onto a pouch of Decorating Icing. Cover your baked item with icing, sugar and/or sprinkles. Be creative!

Once the pop is decorated, carefully push the skewer into the apple until it is secure. Place a small item such as a blueberry or grape on top of the skewer to finish the pop.
 Repeat the process placing 2 or 3 pops in each apple. Fill as many apples as you like.

*Helpful Hint – Place skewers on top of apples and only slightly slanted. Placing skewers in the sides of the apples will cause the apples to topple over.
")
Head over to Back to School Bake-off to see my Back to School Snack Pops and other fun ideas!
Happy Fall!
Leslie xo
| Back-to-School Snack Pops |
- Assorted miniature baked goods – donut holes, cake pops, mini muffins
- Assorted small fruit items – red and green grapes, blueberries, blackberries, strawberries
- Cake Mate and Betty Crocker Decorating Icings in a variety of colors
- Assorted decorating items – nonpareils, sugars, sprinkles
- Wooden skewers
- Apples for displaying Snack Pops
- Place baked items and fruit in separate bowls to prepare for assembly.
- Arrange apples on a serving dish or platter.
- Working with one skewer at a time, begin alternately sliding fruit and baked goods onto the skewer. Leave about a 1 ½ to 2 inches at the bottom so the skewer can be pushed into the apple. You will also need to leave enough room on the top of the skewer so you can hold onto it.
- Place a star tip onto a pouch of Decorating Icing. Cover your baked item with icing, sugar and/or sprinkles. Be creative!
- Once the pop is decorated, carefully push the skewer into the apple until it is secure. Place a small item such as a blueberry or grape on top of the skewer to finish the pop.
- Repeat the process placing 2 or 3 pops in each apple. Fill as many apples as you like.
*Helpful Hint – Place skewers on top of apples and only slightly slanted. Placing skewers in the sides of the apples will cause the apples to topple over.
Summer Fun ~ Simple Jewelry Making Tutorial

I consider myself a creative person. Always thinking, always creating and constantly looking for unique ways to do things. About ten years ago, on a rainy day, I took my daughter Lynsie and her friend to a bead store at the beach to make jewelry. I was hooked and fell in love with the idea of designing unique pieces of jewelry. I ended up starting a small business the following year. I sold the jewelry I designed at local events and eventually to retail stores and an online boutique. I am doing much less designing these days, just special orders and events, but I love to sit down and create a unique piece of jewelry for myself or my daughters once in a while, just for fun.
For this post I thought I'd show you how easy it is to create your own jewelry. I put together a step-by-step guide with video tutorials to help you. Once you have the basics down, the possibilities are endless. It's a fun thing to do with your kids or girlfriends too. So let’s grab some supplies and get started!
*All of the supplies that are listed here can be found at most craft stores like Michaels or purchased online at sites like Auntie's Beads.
BEADS
You can go to any craft store to buy beads. When I am designing a piece of jewelry I will use anything from high quality sterling silver and crystal to beads from broken jewelry, antique stores, etc. So feel free to use whatever you like, it's your bracelet! This bracelet does not have a pattern so any color and shape will do. Try to choose beads that are not too big. Since this will be one long strand you want to keep it light so smaller beads are better. Mine range from tiny seed beads to 10 mm pearls and crystals.

BEADING WIRE ~ TOGGLE CLASP ~ CRIMPING BEADS
beading wire ~ you will want to use a flexible beading wire that is not too heavy. I used a .021 inch diameter, 7 strand beading wire from Beadalon. *The color is listed as "bright" or "clear" but it's actually silver wire.
toggle clasp ~ a toggle clasp comes in two pieces and lots of different shapes and sizes. Toggle clasps are much more interesting than a regular clasp and they make taking your bracelet on and off easier. Use whatever fits your style.
crimping beads ~ crimping or crimp beads are used to secure the wire on the ends of the bracelet. I used 2x2mm sterling silver crimping beads.

TOOLS
wire cutter ~ wire or end cutter
crimping tool ~ this tool secures the crimping bead to the wire to close the end of your bracelet (a must have for making jewelry)
pliers ~ flat nose pliers to hold or pull your wire
 Now that you have your supplies you are ready to start creating! Place your beads on a jewelry mat or towel to keep them from rolling around while you work.
Step 1: Start stringing your beads one at a time onto the beading wire while the wire is still attached to the spool. Feel free to design your bracelet to fit your style. If you want to make a pattern it's a good idea to arrange the beads on your mat before you string them. I like to just grab and string my beads in no particular order for a look that is unique.
http://www.youtube.com/watch?v=LO7s4uOs1fE
Step 2: This is where you will need to decide how many times you want your bracelet to wrap around your wrist. Measure your wrist. Take the measurement of your wrist and add an inch. Multiply that number by the number of times you want the bracelet to go around your wrist. Example: 6" (my wrist) + 1" = 7" X 4 (number of times I want the bracelet to wrap around) = 28" (the total length of my beaded wire). String your beads until the strand is that long.
http://www.youtube.com/watch?v=WLp1dx_Qg1A&feature=player_detailpage
Step 3: Now that you are finished stringing your beads you are ready to close the ends of the wire. You will start with the end of the wire that is not attached to the spool. Slide a crimping bead onto the wire. Next slide one end of your clasp onto the wire. Take the end of the wire and go back through the crimping bead. Use your pliers to pull the wire close to the clasp. Use your crimping tool to pinch the crimping bead closed. Cut the excess wire. You are almost finished!
http://www.youtube.com/watch?v=8mJXgGeCTEk&feature=player_embedded#t=0s
~ Before you finish your bracelet it's a good idea to do a size check. Hold onto the unfinished end of your strand of beads and wrap it around your wrist to see how it will fit. Keep in mind that your toggle clasp will add about 1/2 " or so depending on its size. If it fits , move to step 4. If you think it's too long, move to step 4 and remove a few beads once the wire is cut. If it's too short, move to step 4 but allow for extra wire so you can add some beads before finishing the bracelet.
Step 4: Grab the end of the beaded wire without the clasp and cut it from the spool making sure to leave at LEAST 6" to work with. Push the beads down to the closed end so there are no gaps between the beads. Slide a crimping bead onto the wire. Slide the other half of your toggle clasp on next. Take the end of your wire and go back through the crimping bead *(Ok this is where I make a mistake! In the video I say toggle when I meant crimp. You will see what I mean but you will get it because you already did it. Trust me, it was not worth remaking the video but it is worth pointing out). Working with your pliers, pull your wire tight against the end of the toggle clasp making sure the beads are lined up nicely and there are no gaps in the wire. Use your crimping tool to secure the end of the wire. Cut the excess wire with your cutting tool. Congratulations! You have just completed your wrap bracelet!
http://www.youtube.com/watch?v=5uhSVrvsluM&feature=player_detailpage
Wasn't that easy? I hope you enjoyed the video tutorials! I would love your feedback since this was my first attempt at using them. It was quite a process to figure it all out (I won't even tell you how hard my daughters and I laughed at my voice when we watched them) but I think it will be fun to bring you a variety of posts that include them. I think it makes it more personal. And speaking of personal, I plan to introduce myself to you as soon as I can do it without laughing! I want you to get to know me and I want to know you! As always, I would love to hear from you!
Happy Beading, Happy Summer!
Leslie
DIY Cupcake Liners

Last fall I entered a local cupcake contest. I love to bake so I thought it would be fun, and anything that allows me to be creative and do my own thing is something I am interested in! I didn't win but it was a great experience and I definitely learned a few things. In an effort to make my cupcakes stand out and look unique I decided to create my own cupcake liners. There are a lot of pretty ones out there but I wanted something different. I decided to use parchment paper and as you can see the result was beautiful. It was so simple to do and it looked great so I thought I would make them again and show you how to do it.
")
Cut pieces of parchment paper into approximately 7” X 7” squares. Cut as many pieces as you need for the batch of cupcakes you are making (and maybe a few extra). Using a small juice glass push the parchment paper into the well of a cupcake pan and twist the glass so that the paper takes the shape of the pan.

You may need to take the glass out and fold the paper around it with your hand to reinforce the creases. Place the paper back into the pan and repeat with the next sheet.

Once your cupcake pan is full it will look something like this. Don't worry if your liners are popping up out of the pan. They will stay down when you pour the batter in.

Prepare your cupcake batter and carefully pour it into the pan. I use a measuring cup with a spout for more control.

The batter will go into the folds of the cupcake liner. Don’t worry, if you cut your liners big enough it will not leak out.

Place pan in a preheated oven and bake according to the cupcake recipe you are using.


Once baked, remove cupcakes from oven. Leave the cupcakes in the pan for 5-10 minutes until they begin to cool. You will notice the cupcakes have taken the shape of the liner and have baked evenly.

Remove the cupcakes from the pan gently to cool completely. The cupcakes are delicate and the papers will pull away from them if you are not careful.

Finish the cupcakes with your favorite frosting and just wait and see how much attention they get! All it took was a little parchment paper!

*Be sure and stop back next week because I'll be sharing the recipe for these Deep Dark Chocolate Cupcakes and the frosting on top! Guess what flavor it is?
Photos by Leslie Reese
Here's what's coming up...
You can put any content in here.